Content Menu
● Why Dehydrate Herbs?
● Types of Herbs Suitable for Dehydration
● Preparing Herbs for Dehydration
● Using a Food Dehydrator
● How to Know When Herbs Are Done
● Storing Dried Herbs
● How to Use Dried Herbs
● Tips for Successful Herb Dehydration
● Common Issues When Dehydrating Herbs
● Advanced Techniques for Dehydrating Herbs
● Conclusion
● FAQ
>> 1. What types of herbs can I dehydrate?
>> 2. How long does it take to dehydrate herbs?
>> 3. Can I dehydrate wet herbs?
>> 4. How should I store my dried herbs?
>> 5. Can I use dried herbs in place of fresh ones?
● Citations:
Dehydrating herbs is a practical and efficient way to preserve their flavor, aroma, and nutritional value. Using a food dehydrator allows you to control the drying process, ensuring that your herbs maintain their vibrant colors and essential oils. This guide will cover everything you need to know about dehydrating herbs, from selecting the right herbs to storing them properly.

Why Dehydrate Herbs?
Dehydrating herbs offers several benefits:
- Preservation: Extends the shelf life of fresh herbs, allowing you to enjoy them long after their harvest season.
- Flavor Concentration: Dried herbs have a more intense flavor compared to fresh ones, making them a great addition to various dishes.
- Convenience: Having dried herbs on hand simplifies meal preparation and reduces food waste.
Types of Herbs Suitable for Dehydration
Most culinary herbs can be dehydrated successfully. Here are some popular choices:
- Basil
- Oregano
- Thyme
- Rosemary
- Mint
- Dill
- Sage
- Cilantro
When selecting herbs for dehydration, choose fresh, vibrant leaves without any signs of wilting or browning.
Preparing Herbs for Dehydration
Before you start the dehydration process, proper preparation is crucial. Follow these steps:
1. Wash the Herbs: Rinse the herbs under cool water to remove any dirt or insects. Gently shake off excess water or use a salad spinner.
2. Trim and Sort: Remove any thick stems and discard damaged or bruised leaves. Keep only healthy leaves for drying.
3. Dry the Herbs: Pat the herbs dry with a clean towel to remove moisture, which can affect the drying process.
Using a Food Dehydrator
Using a food dehydrator is one of the most effective methods for drying herbs. Here's how to do it:
1. Preheat the Dehydrator: Set your dehydrator between 95°F (35°C) and 115°F (46°C). For humid climates, you may need to increase this to 125°F (52°C).
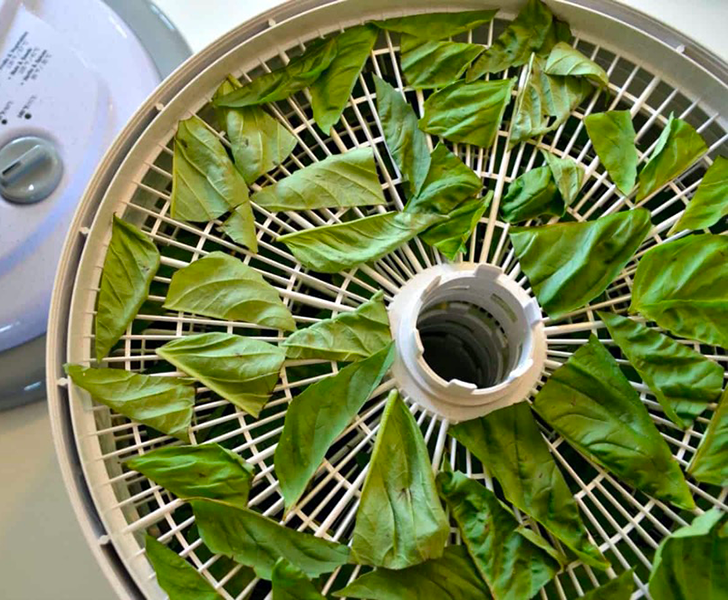
2. Arrange the Herbs: Place the prepared herbs in a single layer on the dehydrator trays. Avoid overlapping to ensure even airflow around each leaf.
3. Dehydrate: Drying times vary depending on the type of herb and moisture content but typically range from 4 to 12 hours. Check periodically for doneness; herbs should be crisp and crumble easily when rubbed between your fingers.
4. Rotate Trays: If your dehydrator has multiple trays, consider rotating them halfway through the drying process for uniform results.
How to Know When Herbs Are Done
To determine if your herbs are fully dried:
- Allow them to cool for a few minutes.
- Rub a leaf between your fingers; it should crumble easily if it's adequately dried.
If they feel leathery or bend without breaking, they need more time in the dehydrator.
Storing Dried Herbs
Proper storage is essential for maintaining the quality of your dried herbs:
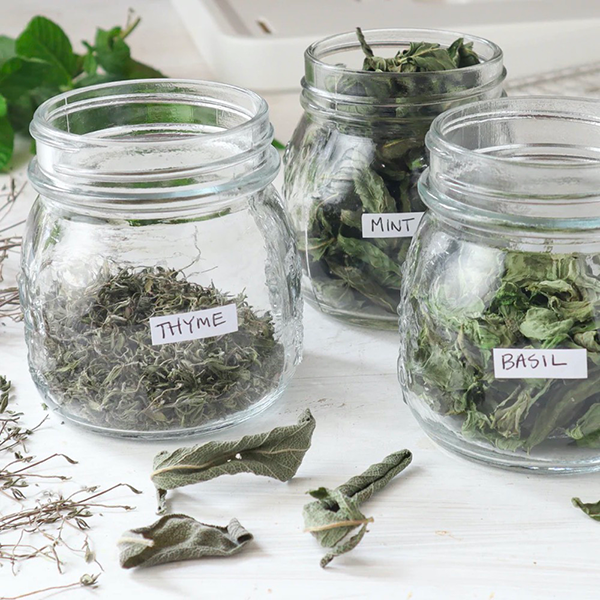
1. Choose Airtight Containers: Glass jars with tight-fitting lids or vacuum-sealed bags work best.
2. Label and Date: Always label your containers with the herb name and date of dehydration.
3. Store in a Cool, Dark Place: Keep your dried herbs away from light and heat sources to prevent degradation of flavor and color.
How to Use Dried Herbs
Dried herbs can be used similarly to fresh ones but remember that they are more concentrated in flavor. As a general rule:
- Use about one-third of the amount of dried herb compared to fresh (e.g., 1 tablespoon fresh = 1 teaspoon dried).
Dried herbs can be rehydrated in warm water or added directly into dishes like soups, stews, marinades, and sauces.

Tips for Successful Herb Dehydration
To maximize your success in dehydrating herbs, consider these additional tips:
- Group Similar Herbs Together: Different types of herbs may require different temperatures and drying times. Grouping similar herbs ensures they dry evenly without compromising flavor.
- Avoid Overcrowding: Make sure there is enough space between leaves on each tray for air circulation, which is crucial for even drying.
- Use Non-Stick Trays: If you're concerned about sticking, consider using non-stick dehydrator sheets or lightly greasing your trays with cooking spray before placing the herbs on them.
- Monitor Humidity Levels: High humidity can slow down the drying process significantly. If you're in a humid environment, you might want to run a dehumidifier in the room where you're dehydrating your herbs.
Common Issues When Dehydrating Herbs
Even with careful preparation, issues can arise during dehydration:
- Uneven Drying: This can occur if trays are overcrowded or if airflow is restricted. To combat this, rotate trays regularly and ensure adequate spacing between leaves.
- Excessive Moisture Retention: If some leaves remain moist after drying, they can lead to mold during storage. Ensure all leaves are completely dry before storing them away.
- Loss of Flavor: Over-drying can lead to loss of essential oils that contribute to flavor. Monitor closely towards the end of the drying process to avoid this issue.
Advanced Techniques for Dehydrating Herbs
For those looking to take their herb dehydration skills further, consider these advanced techniques:
1. Blanching Before Drying: For some tougher leafy greens like kale or collard greens, blanching briefly before dehydration can help retain color and flavor while speeding up drying time.
2. Creating Herb Blends: Combine different dried herbs into unique blends tailored for specific cuisines (e.g., Italian seasoning with basil, oregano, and thyme) which can enhance your cooking versatility.
3. Infused Oils: After dehydrating certain herbs like rosemary or garlic, consider infusing them into oils for flavorful dressings or marinades that capture their essence without losing potency over time.
4. Experimenting with Flavors: Try mixing dried herbs with spices or salts before storing them together; this can create custom seasoning blends that are ready-to-use when cooking.
5. Using Different Drying Methods: While food dehydrators are excellent tools, you might also explore other methods like air-drying or oven-drying for specific types of herbs if you lack access to a dehydrator at certain times.
Conclusion
Dehydrating herbs at home is an excellent way to preserve their flavors and enjoy them throughout the year. With just a few simple steps using a food dehydrator, you can turn fresh herbs from your garden into flavorful additions for your culinary creations. By following this comprehensive guide—covering everything from preparation through storage—you'll be well-equipped to maximize both flavor and shelf life in your herb preservation efforts.

FAQ
1. What types of herbs can I dehydrate?
You can dehydrate many types of culinary herbs such as basil, oregano, thyme, rosemary, mint, dill, sage, and cilantro.
2. How long does it take to dehydrate herbs?
The drying time varies depending on the herb type and moisture content but typically ranges from 4 to 12 hours in a dehydrator.
3. Can I dehydrate wet herbs?
It's best to dry herbs thoroughly before placing them in the dehydrator; excess moisture can lead to mold growth during storage.
4. How should I store my dried herbs?
Store dried herbs in airtight containers in a cool, dark place away from light and heat sources.
5. Can I use dried herbs in place of fresh ones?
Yes! However, because dried herbs are more concentrated in flavor, use about one-third of what you would use if using fresh herbs.
Citations:
[1] https://www.cnet.com/pictures/tips-for-using-your-new-dehydrator/
[2] https://royalangkor.ca/commercial-food-dehydrator/
[3] https://www.treelinereview.com/gearreviews/best-food-dehydrator
[4] https://www.backpackingchef.com/dehydrating-food.html
[5] https://dehydratedfoodz.com/issues-with-food-dehydrators/
[6] https://www.thespruceeats.com/best-food-dehydrators-4077285
[7] https://learn.eartheasy.com/guides/a-beginners-guide-to-dehydrating-food/
[8] https://www.youtube.com/watch?v=SwELNvW5YSo
[9] https://www.seriouseats.com/best-food-dehydrators-5216308
[10] https://www.freshoffthegrid.com/dehydrating-food/


