Content Menu
● Understanding Food Dehydration
● Benefits of Using a Food Dehydrator
● Selecting the Right Meat
● Preparing Meat for Dehydration
● Dehydrating Meat
● Storing Dehydrated Meat
● Rehydrating Meat
● Additional Tips for Successful Dehydration
● Common Mistakes to Avoid
● Types of Meat Suitable for Dehydration
>> Beef Jerky
>> Chicken Jerky
>> Pork Jerky
>> Fish Jerky
● Recipes Using Dehydrated Meat
>> Backpacking Chili
>> Chicken Alfredo Pasta
● Advanced Storage Solutions
>> Vacuum Sealing Techniques
>> Canning Jars
● Troubleshooting Common Issues
>> Case Hardening
>> Uneven Drying
● Conclusion
● FAQ
>> 1. What types of meat can I dehydrate?
>> 2. Do I need to cook the meat before dehydrating?
>> 3. How do I know when my meat is fully dehydrated?
>> 4. Can I use marinades when dehydrating?
>> 5. How long can I store dehydrated meat?
● Citations:
Dehydrating meat is an excellent way to preserve it for long-term storage, create lightweight snacks for hiking or camping, and enhance the flavor of your meals. This comprehensive guide will walk you through the process of dehydrating meat using a food dehydrator, ensuring that you achieve the best results while maintaining food safety.
Understanding Food Dehydration
Dehydration is the process of removing moisture from food, which helps to inhibit the growth of bacteria, yeasts, and molds. When it comes to meat, proper dehydration can extend its shelf life significantly while retaining essential nutrients.
Benefits of Using a Food Dehydrator
Using a food dehydrator has several advantages:
- Controlled Temperature: Unlike air drying or sun drying, a dehydrator allows you to set and maintain specific temperatures for optimal drying.
- Efficiency: Dehydrators can dry large batches of meat at once, saving time and energy compared to traditional methods.
- Quality Preservation: A dehydrator helps retain the flavor and nutritional value of the meat better than other preservation methods.
Selecting the Right Meat
When choosing meat for dehydration, consider the following:
- Lean Cuts: Opt for lean cuts of meat as fat can spoil faster and lead to rancidity. Good choices include chicken breast, turkey breast, lean cuts of beef (like sirloin), and pork loin.
- Freshness: Always use fresh meat without any signs of spoilage.
Preparing Meat for Dehydration
Proper preparation is crucial for successful dehydration. Follow these steps:
1. Trim Fat: Remove all visible fat from the meat as it can cause spoilage.
2. Cut into Uniform Pieces: Slice the meat into thin, uniform strips (about 1/8 to 1/4 inch thick) to ensure even drying.
3. Marinate (Optional): If desired, marinate your meat for added flavor. Common marinades include soy sauce, garlic powder, and pepper.
4. Pre-cook (Essential): Cook the meat to a safe internal temperature before dehydrating:
- Beef should reach at least 160°F (71°C).
- Poultry should be cooked to 165°F (74°C).
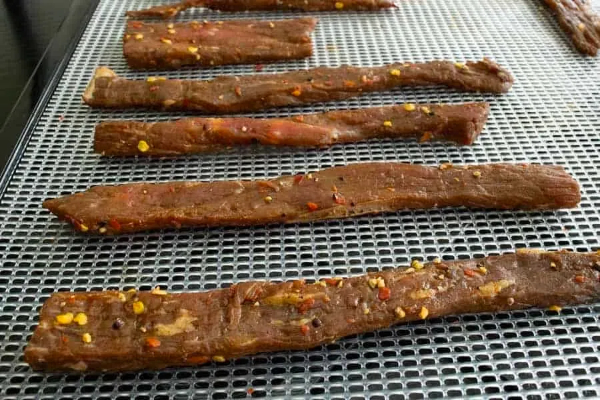
Dehydrating Meat
Once your meat is prepped, it's time to dehydrate:
1. Set Up Your Dehydrator: Place the dehydrator on a stable surface and plug it in.
2. Arrange Meat on Trays: Lay the meat strips in a single layer on the dehydrator trays without overlapping to allow for proper air circulation.
3. Temperature Settings: Set your dehydrator to a temperature between 145°F (63°C) and 160°F (71°C). Most sources recommend around 155°F (68°C) for optimal results.
4. Drying Time: The drying time will vary based on the type of meat and thickness of slices:
- Chicken breast typically takes about 6-8 hours.
- Beef jerky may take 4-6 hours depending on thickness.
- Ground meats generally require longer drying times.
5. Check Progress: Periodically check the progress of your dehydrating meat. It should be dry but still slightly pliable; it should not snap when bent.
6. Cooling: Once done, allow the dehydrated meat to cool completely before storing it in airtight containers.
Storing Dehydrated Meat
To maximize shelf life:
- Store in airtight containers or vacuum-sealed bags.
- Keep in a cool, dark place away from moisture and sunlight.
- Label containers with the type of meat and date of dehydration.
Rehydrating Meat
To use dehydrated meat in recipes:
1. Soak in Water: Place the dehydrated meat in warm water for about 10-30 minutes until rehydrated.
2. Cooking: Use rehydrated meat in soups, stews, or other dishes as needed.
Additional Tips for Successful Dehydration
To improve your dehydration process further:
- Use High-Quality Meat: Always select high-quality cuts of meat that are fresh and free from blemishes or odors.
- Avoid Cross-Contamination: Dehydrate meats separately from fruits or vegetables to prevent cross-contamination. Clean your dehydrator thoroughly between uses.
- Monitor Temperature Regularly: Ensure that your dehydrator maintains consistent temperatures throughout the drying process. If your model lacks precise controls, consider investing in one that does.
- Experiment with Seasonings: Enhance flavor by experimenting with different spice blends or marinades before dehydration.
- Test Dryness Before Storing: Ensure that all pieces are completely dry before packaging them away. Any remaining moisture can lead to spoilage later on.

Common Mistakes to Avoid
Avoid these common pitfalls when dehydrating meat:
- Not Trimming Enough Fat: Leaving too much fat on can lead to rancidity over time; always trim excess fat thoroughly before dehydration.
- Overcrowding Trays: Make sure there is enough space between pieces for air circulation; overcrowding can result in uneven drying.
- Ignoring Drying Times: Each type of meat has its own optimal drying time; don't assume they will all dry at the same rate just because they are similar sizes or types.
Types of Meat Suitable for Dehydration
Beef Jerky
Beef jerky is one of the most popular dried meats due to its rich flavor and versatility. When preparing beef jerky:
- Choose Cuts Wisely: Top round or eye round cuts are ideal due to their low-fat content.
- Marinate Overnight: For enhanced flavor, marinate overnight using soy sauce, Worcestershire sauce, garlic powder, onion powder, black pepper, and red pepper flakes if you prefer a spicy kick.
- Slice Against Grain: Cutting against the grain ensures tenderness once dried; if cut with grain fibers intact, jerky may end up chewy rather than tender.
Chicken Jerky
Chicken jerky offers a leaner alternative with high protein content:
- Pressure Cooking Technique: As mentioned earlier, pre-cooking chicken in a pressure cooker breaks down fibers effectively.
- Flavor Infusion: Consider using lemon juice or vinegar-based marinades which not only add flavor but also help tenderize the chicken further.
Pork Jerky
Pork jerky provides a unique taste profile compared to beef or chicken:
- Choose Lean Cuts Like Loin or Ham: These cuts work best due to their lower fat content.
- Sweet Marinades Work Well: Try using honey-based marinades combined with soy sauce for an interesting sweet-savory balance.
Fish Jerky
Fish like tuna or salmon can also be dried effectively:
- Use Solid White Tuna Packed in Water: This type provides better results than oil-packed varieties.
- Simple Preparation Method: Drain excess water from canned fish before breaking it into smaller pieces; arrange evenly on trays.
Recipes Using Dehydrated Meat
Dehydrated meats are incredibly versatile and can be used in various recipes:
Backpacking Chili
Ingredients:
- 1 cup rehydrated ground beef
- 1 cup freeze-dried beans
- 2 cups vegetable broth
- Spices (cumin, chili powder)
Instructions:
1. Combine all ingredients in a pot.
2. Bring broth to boil.
3. Simmer until beans are tender.
Chicken Alfredo Pasta
Ingredients:
- Rehydrated chicken
- Dried fettuccine noodles
- Cream sauce mix
- Parmesan cheese
Instructions:
1. Boil water and cook pasta according to package instructions.
2. Add rehydrated chicken and cream sauce mix.
3. Stir until well combined; top with Parmesan cheese.
Advanced Storage Solutions
To ensure longevity beyond basic storage methods:
Vacuum Sealing Techniques
Vacuum sealing removes air from packaging which significantly extends shelf life:
1. Use vacuum seal bags specifically designed for food storage.
2. Ensure bags are clean and dry before sealing.
3. Label each bag with contents and date.
Canning Jars
For those looking into long-term storage options beyond vacuum sealing:
1. Use mason jars with airtight seals.
2. Store jars in dark places away from direct sunlight.
Troubleshooting Common Issues
Even experienced users may face challenges during dehydration:
Case Hardening
This occurs when food dries too quickly on the outside while remaining moist inside:
Solution:
Reduce temperature settings during initial stages of drying; ensure consistent airflow around trays.
Uneven Drying
If some pieces dry faster than others:
Solution:
Rotate trays periodically throughout the drying process; check thickness consistency before starting.
Conclusion
Dehydrating meat at home using a food dehydrator is a straightforward process that can yield delicious and nutritious results. By following these steps carefully—from selecting lean cuts to ensuring proper storage—you can enjoy flavorful dried meats that are perfect for snacking or adding protein to your meals. With practice and experimentation, you'll find what works best for you and develop your own techniques for maximizing flavor and preservation quality.

FAQ
1. What types of meat can I dehydrate?
You can dehydrate various meats including chicken, beef, turkey, pork, and even fish like tuna or salmon.
2. Do I need to cook the meat before dehydrating?
Yes, cooking the meat before dehydration is essential for food safety as it kills harmful bacteria that could survive during drying.
3. How do I know when my meat is fully dehydrated?
The meat should be dry yet slightly pliable; it should not snap when bent but should feel firm with no moisture visible when torn apart.
4. Can I use marinades when dehydrating?
Absolutely! Marinades can enhance flavor; just ensure that they do not contain too much sugar or oil which can affect drying times.
5. How long can I store dehydrated meat?
Properly stored dehydrated meat can last from one year up to two years depending on storage conditions—keep it cool and dry!
Citations:
[1] https://www.youtube.com/watch?v=Zba3N9H6fTE
[2] https://explorenborgen.com/dehydrating-meat/
[3] https://www.youtube.com/watch?v=SwELNvW5YSo
[4] https://www.cnet.com/pictures/tips-for-using-your-new-dehydrator/
[5] https://www.backpackingchef.com/dehydrating-meat.html
[6] https://pickyourown.org/dryingfoods-solving-common-problems.php
[7] https://www.campkitchen.ca/blog/dehydrating-basics
[8] https://www.fao.org/4/x6932e/x6932e02.htm
[9] https://www.commercialdehydrators.com.au/post/jerky-food-safety
[10] https://www.commercialdehydrators.co.uk/dehydrated-meats


