Content Menu
● Understanding Food Dehydrators
● Preparing Dill for Drying
● Setting Up the Dehydrator
● Monitoring the Drying Process
● Storing Dried Dill
● Uses for Dried Dill
● Caring for Your Food Dehydrator
● Tips for Successful Dehydration
● Conclusion
● FAQ
>> 1. How long does it take to dry dill in a dehydrator?
>> 2. Can I dry other herbs in the same dehydrator?
>> 3. How do I know when my dill is fully dried?
>> 4. What's the best way to store dried dill?
>> 5. Can I use an oven instead of a dehydrator?
● Citations:
Dill is a versatile herb known for its distinct flavor, often used in culinary dishes, pickling, and garnishing. Drying dill not only preserves its flavor but also allows you to enjoy this herb long after its growing season. Using a food dehydrator is one of the most efficient methods for drying dill, as it provides controlled heat and airflow, resulting in evenly dried herbs. This article will guide you through the process of drying dill using a food dehydrator while also discussing the benefits of using a dehydrator for this purpose.
Understanding Food Dehydrators
A food dehydrator is an appliance designed to remove moisture from food, allowing it to be preserved for longer periods. The process involves circulating warm air around the food items, which helps evaporate moisture without cooking them.
Benefits of Using a Food Dehydrator:
- Controlled Environment: Unlike air drying or oven drying, dehydrators maintain a consistent temperature and airflow, ensuring even drying.
- Preservation of Nutrients: Dehydrators operate at lower temperatures compared to ovens, which helps retain more nutrients in the food.
- Efficiency: Food dehydrators can dry herbs like dill much faster than traditional methods, often within a few hours.
Preparing Dill for Drying
Before you start the drying process, it's essential to prepare your dill properly.
1. Harvesting: Pick fresh dill in the morning after the dew has dried but before it gets too hot. This ensures that the oils responsible for its flavor are preserved.
2. Washing: Rinse the dill under cool water to remove any dirt or insects.
3. Drying: Gently pat the dill dry with paper towels or use a salad spinner to remove excess moisture.
4. Trimming: Remove any thick stems or wilted leaves. You want to keep only the fresh fronds for drying.
Setting Up the Dehydrator
Once your dill is prepared, it's time to set up your food dehydrator.
1. Arrange on Trays: Spread the dill evenly on the dehydrator trays in a single layer. Avoid overlapping to allow proper air circulation.
2. Temperature Settings: Set your dehydrator to a low temperature between 95°F and 115°F (35°C - 46°C). This range is ideal for drying herbs without cooking them.
3. Drying Time: Depending on your dehydrator and humidity levels, drying time can vary. Generally, dill takes about 2 to 4 hours to dry completely.

Monitoring the Drying Process
During the drying process, it's crucial to monitor your dill:
- Check your dill after 2 hours. The leaves should feel brittle and crumble easily when touched.
- If they are still soft or pliable, continue drying and check every 15-20 minutes until fully dried.
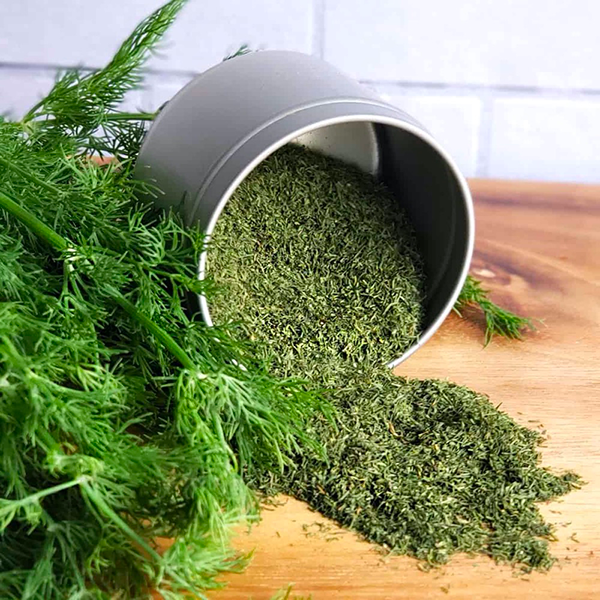
Storing Dried Dill
Once your dill is completely dried:
1. Cooling: Allow it to cool completely before handling.
2. Removing Stems: Remove any remaining stems and crumble the dried leaves into smaller pieces if desired.
3. Storage: Store your dried dill in an airtight container or glass spice jar in a cool, dark place to preserve its flavor and aroma.
Uses for Dried Dill
Dried dill can enhance various dishes:
- Cooking: Use it in soups, stews, sauces, and marinades.
- Pickling: Add it to pickling brines for an extra burst of flavor.
- Seasoning: Sprinkle it on fish, potatoes, or salads for added taste.
Caring for Your Food Dehydrator
To ensure that your food dehydrator lasts for many years and continues performing optimally, proper care and maintenance are essential:
1. Cleaning After Use: Always clean your dehydrator after each use. Most parts are dishwasher safe; however, hand washing with mild detergent is also effective.
2. Avoiding Sticking: To prevent food from sticking to trays, consider using non-stick spray or lining trays with parchment paper during initial drying stages.
3. Regular Maintenance: Periodically wipe down the main unit of your dehydrator to remove dust and sticky residues from temperature gauges and doors.
4. Soaking Stubborn Residues: For stubborn messes on trays, soak them in hot soapy water before scrubbing gently with a soft cloth.
5. Check Air Circulation: Ensure that air vents are not blocked during operation for optimal performance.
Tips for Successful Dehydration
To achieve the best results when using your food dehydrator:
- Always dehydrate similar items together that require the same temperature settings.
- Cut pieces uniformly to ensure even drying times.
- Rotate trays periodically if your dehydrator does not have horizontal airflow technology.
- Avoid overcrowding trays; leave space between items for adequate air circulation.
- Monitor moisture levels; if items feel sticky or moist after drying time has elapsed, return them to the dehydrator until fully dried.
Conclusion
Drying dill in a food dehydrator is an easy and efficient way to preserve this flavorful herb for future use. With minimal preparation and monitoring required during the drying process, you can enjoy home-dried dill that retains its vibrant taste and aroma long after harvesting season has ended.
By following these steps and tips outlined above, you can ensure that you have a steady supply of dried dill at your fingertips for all your culinary needs while maintaining your food dehydrator in excellent condition.

FAQ
1. How long does it take to dry dill in a dehydrator?
It typically takes about 2 to 4 hours to dry dill completely in a food dehydrator at temperatures between 95°F and 115°F (35°C - 46°C).
2. Can I dry other herbs in the same dehydrator?
Yes, you can dry other herbs in the same dehydrator as long as they have similar drying times and temperature requirements.
3. How do I know when my dill is fully dried?
Dill is fully dried when its leaves feel brittle and crumble easily when touched. If they are still soft or pliable, they need more time in the dehydrator.
4. What's the best way to store dried dill?
Store dried dill in an airtight container or glass spice jar kept in a cool, dark place to maintain its flavor and aroma.
5. Can I use an oven instead of a dehydrator?
Yes, you can use an oven set at its lowest temperature (around 170°F/77°C), but it may require more monitoring and can lead to uneven drying compared to using a dehydrator.
Citations:
[1] https://farmerswiferambles.com/care-for-your-food-dehydrator/
[2] https://www.cnet.com/pictures/tips-for-using-your-new-dehydrator/
[3] https://www.freshoffthegrid.com/drying-herbs/
[4] https://nouveauraw.com/reference-library/dehydrator-basics/how-to-clean-and-care-for-your-dehydrator/
[5] https://www.osbheatpump.com/news/how-to-use-a-food-dehydrator-10-useful-tips-for-beginners-and-advanced-users/
[6] https://theherbalacademy.com/blog/dry-fresh-herbs-using-a-dehydrator/
[7] https://excaliburdehydrator.com/pages/intro-to-dehydrating
[8] https://homesteadingfamily.com/preservation-101-intro-to-dehydrating-food/
[9] https://extension.oregonstate.edu/sites/default/files/documents/8836/sp50921dryingherbs.pdf
[10] https://brodandtaylor.com/blogs/recipes/dehydrating-herbs


