Content Menu
● Introduction
● Benefits of Using a Food Dehydrator
● Materials Needed
● Step-by-Step Guide
>> 1. Preparing the Refrigerator
>> 2. Installing the Fan and Heating Element
>> 3. Creating Air Vents
>> 4. Monitoring Temperature
>> 5. Adding Food
>> 6. Sealing Gaps
>> 7. Rotating and Checking Food
● Understanding the Dehydration Process
● Tips for Successful Dehydration
● Storing Dehydrated Foods
● Conclusion
● FAQ
>> 1. What types of food can I dehydrate in my DIY dehydrator?
>> 2. How long does it take to dehydrate food?
>> 3. Can I use any type of refrigerator?
>> 4. Is it safe to dehydrate meat in my homemade dehydrator?
>> 5. How do I clean my dehydrator after use?
● Citations:
Food dehydration is a popular method for preserving food by removing moisture, which helps to extend its shelf life while intensifying flavors. While commercial food dehydrators can be expensive, you can create your own using an old refrigerator. This guide will walk you through the steps to transform a refrigerator into a functional food dehydrator, allowing you to enjoy dried fruits, vegetables, and meats at home.
Introduction
Dehydrating food not only preserves it but also concentrates its flavors, making it an excellent choice for snacks, camping trips, or long-term storage. By repurposing an old refrigerator, you can create an efficient dehydrator that rivals store-bought models. The following sections detail the materials needed, preparation steps, and the dehydration process itself.
Benefits of Using a Food Dehydrator
Before diving into the construction of your DIY dehydrator, it's essential to understand the benefits of food dehydration:
- Preservation of Nutrients: Dehydration retains most vitamins and minerals in fruits and vegetables compared to other preservation methods like canning or freezing.
- Long Shelf Life: Dehydrated foods can last for years when stored properly, making them ideal for long-term storage and reducing food waste.
- Cost-Effective: You can buy produce in bulk when it's in season and dehydrate it for later use, saving money on out-of-season or processed foods.
- Healthy Snacking: Dried fruits and vegetables are nutritious snacks free from preservatives and added sugars found in many commercial products.
- Versatility: Beyond fruits and vegetables, you can dehydrate herbs, make jerky, create fruit leathers, and even prepare pet treats.
Materials Needed
Before you start converting your refrigerator into a dehydrator, gather the following materials:
- An old refrigerator (preferably non-functional)
- Shelves or mesh racks for placing food
- A small fan to circulate air
- A heating element (like a light bulb or heating coil)
- Thermometers to monitor temperature
- Silicone or food-grade sealant for sealing gaps
- Drill with bits for creating air vents
Step-by-Step Guide
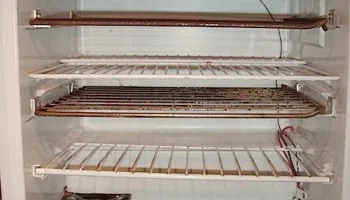
1. Preparing the Refrigerator
Begin by thoroughly cleaning the refrigerator. Remove any shelves and compartments to create ample space for drying food. Ensure that there are no lingering odors or contaminants.
2. Installing the Fan and Heating Element
To facilitate air circulation and maintain consistent heat:
- Fan Installation: Position the fan inside the fridge, preferably on the back wall, to circulate air effectively. Depending on your fridge's size, you may need multiple fans.
- Heating Element Installation: Install a heating element inside the fridge. This could be a light bulb (preferably incandescent) or a heating coil that provides gentle heat.
3. Creating Air Vents
To allow fresh air in and moisture out:
- Drill small holes near the top and bottom of the refrigerator. These vents will ensure proper airflow during the dehydration process.
4. Monitoring Temperature
Place thermometers at various locations inside the fridge to monitor temperature accurately. This step is crucial for preventing overcooking or undercooking your food.
5. Adding Food
Cut your food into thin, uniform slices to ensure even drying. Place them on the shelves or mesh racks with sufficient space between pieces for airflow.

6. Sealing Gaps
Use silicone or food-grade sealant to seal any gaps or holes in the refrigerator. This will help retain heat and improve efficiency.
7. Rotating and Checking Food
Periodically check on your food during the dehydration process. Rotate trays if necessary to ensure even drying. Keep the door closed as much as possible to maintain temperature.
Understanding the Dehydration Process
Dehydration works by removing moisture from food through controlled heat and airflow. Here's how it functions:
- Heat Source: The dehydrator has a built-in heat source that raises the temperature inside the unit. This is crucial for drawing out moisture content in the food.
- Fan and Airflow: A fan circulates warm air evenly throughout the dehydrator, ensuring that food dries uniformly. Proper airflow is essential to prevent spoilage and maintain nutritional value.
- Trays and Racks: Food is placed on trays or racks inside the dehydrator. These trays allow air to circulate freely around the food, facilitating even dehydration.
Tips for Successful Dehydration
To maximize your dehydrating efforts, consider these tips:
- Thickness Matters: Cut fruits and vegetables into uniform slices (about 1/4 inch thick) to ensure even drying.
- Pretreatment Options: Some foods benefit from pretreatment methods like blanching (briefly boiling) before dehydration to preserve color and nutrients.
- Temperature Control: Most foods dry best at specific temperatures:
- Fruits: 135°F to 140°F (57°C to 60°C)
- Vegetables: 125°F to 135°F (52°C to 57°C)
- Meat (jerky): 145°F to 160°F (63°C to 71°C)
Maintaining these temperatures helps prevent spoilage while ensuring thorough drying.
Storing Dehydrated Foods
Once your food is fully dehydrated, proper storage is crucial:
- Cool Before Storing: Allow dehydrated foods to cool completely before sealing them in airtight containers.
- Use Glass Jars or Vacuum-Sealed Bags: Store dried foods in glass jars or vacuum-sealed bags to minimize exposure to air and moisture.
- Label Your Containers: Always label containers with the contents and date of dehydration for easy tracking of freshness.
Conclusion
Transforming an old refrigerator into a food dehydrator is a practical and cost-effective solution for preserving food at home. By following these steps, you can enjoy a variety of dried foods while repurposing an appliance that might otherwise go unused. Not only does this DIY project save money on commercial dehydrators, but it also allows you to control what goes into your snacks—no preservatives or additives required!

FAQ
1. What types of food can I dehydrate in my DIY dehydrator?
You can dehydrate fruits (like apples and bananas), vegetables (such as tomatoes and peppers), herbs, and meats (like beef jerky).
2. How long does it take to dehydrate food?
Dehydration times vary based on the type of food and thickness of slices but generally range from 6 to 12 hours.
3. Can I use any type of refrigerator?
Yes, any non-functional refrigerator can be repurposed as a dehydrator, but ensure it has enough space for airflow.
4. Is it safe to dehydrate meat in my homemade dehydrator?
Yes, as long as you maintain appropriate temperatures (typically around 160°F for meats) and follow safe handling practices.
5. How do I clean my dehydrator after use?
Remove all trays and wipe down surfaces with warm soapy water. Ensure everything is dry before storing.
Citations:
[1] https://etsolutions.in/how-does-a-food-dehydrator-work-explore-the-benefits-of-food-dehydrators/
[2] https://www.healthline.com/nutrition/dehydrated-food
[3] https://food-hacks.wonderhowto.com/how-to/dehydrate-food-without-dehydrator-0161531/
[4] https://homesteadingfamily.com/preservation-101-intro-to-dehydrating-food/
[5] https://airtekdehydrator.com/health-advantages-using-food-dehydrator/
[6] https://www.rei.com/learn/expert-advice/how-to-dehydrate-food.html
[7] https://www.ballmasonjars.com/step-step-dehydrating.html
[8] https://eatsleepwild.com/homemade-dehydrated-backpacking-meals/
[9] https://www.webmd.com/diet/dehydrating-food-good-for-you
[10] https://www.gardeningknowhow.com/garden-how-to/info/diy-food-dehydrator.htm


