Content Menu
● Why Dehydrate Food?
● Materials Needed
● Tools Required
● Step-by-Step Instructions
>> Step 1: Prepare the Box
>> Step 2: Install Shelves
>> Step 3: Set Up Heating Element
>> Step 4: Dehydrate Your Food
● Common Foods to Dehydrate
● Tips for Successful Dehydration
● Understanding Food Dehydration
>> How Does a Food Dehydrator Work?
● Benefits of Homemade Dehydration
● Dehydration Methods Compared
● Culinary Uses for Dehydrated Foods
● Conclusion
● FAQ
>> 1. What types of foods can I dehydrate?
>> 2. How long does it take to dehydrate food?
>> 3. Can I use my oven instead of a dehydrator?
>> 4. How do I know when my food is fully dehydrated?
>> 5. Is it safe to dehydrate meat?
● Citations:
Creating a homemade food dehydrator is an excellent way to preserve fruits, vegetables, and even meats without the need for expensive commercial dehydrators. This guide will walk you through the process of building your own dehydrator, using simple materials and tools that you may already have at home.
Why Dehydrate Food?
Dehydrating food is a method of preservation that removes moisture from food, preventing the growth of bacteria, yeast, and mold. This process not only extends the shelf life of your food but also concentrates flavors and nutrients.
- Cost-effective: Making your own dehydrator saves money compared to buying a commercial one.
- Healthy snacks: Dehydrated fruits and vegetables make for nutritious snacks without added preservatives.
- Convenience: You can dehydrate seasonal produce to enjoy year-round.
Materials Needed
To build your homemade food dehydrator, you will need the following materials:
- A cardboard box or wooden frame
- Aluminum foil or reflective material
- Light bulb (100 watts recommended)
- Small fan
- Wire racks or mesh screens
- Thermometer (optional)
- Electrical supplies (if wiring light bulbs)
Tools Required
Gather these tools before starting your project:
- Scissors or utility knife
- Drill with bits (for ventilation holes)
- Screwdriver
- Tape (duct tape or strong adhesive tape)
- Wire cutters (if using electrical components)
Step-by-Step Instructions
Step 1: Prepare the Box
1. Choose Your Box: Select a cardboard box or build a frame using plywood. If using cardboard, ensure it is sturdy enough to hold the weight of the food and equipment.
2. Line with Reflective Material: Line the inside of the box with aluminum foil to reflect heat and maximize efficiency.
3. Create Ventilation Holes: Drill several small holes at the bottom and top of the box for air circulation. This is crucial for effective drying.
Step 2: Install Shelves
1. Add Shelves: Insert wire racks or mesh screens into the box. Space them evenly to allow air to circulate around the food.
2. Ensure Stability: Make sure the shelves are secure and can hold the weight of the food without collapsing.
Step 3: Set Up Heating Element
1. Install Light Bulb: Place a 100-watt light bulb at the bottom of the box to provide heat. If you're using a wooden frame, you may need to wire this in safely.
2. Add Fan: Position a small fan near the top of the box to help circulate warm air throughout the dehydrator.
3. Thermometer (Optional): If you have a thermometer, place it inside to monitor temperatures, ensuring they remain between 130°F and 160°F (54°C - 71°C) for effective dehydration.
Step 4: Dehydrate Your Food
1. Prepare Food: Wash and slice fruits or vegetables into uniform pieces for even drying.
2. Arrange on Racks: Place food items on the racks, ensuring they are not touching each other for optimal airflow.
3. Turn On Dehydrator: Plug in your light bulb and fan, allowing them to run continuously until your food reaches the desired dryness level.
4. Check Regularly: Monitor your food every few hours, rotating trays if necessary for even drying.
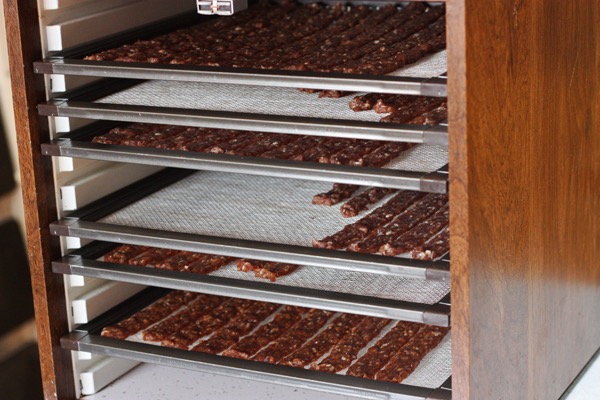
Common Foods to Dehydrate
You can dehydrate a variety of foods including:
- Fruits: Apples, bananas, strawberries
- Vegetables: Tomatoes, peppers, zucchini
- Herbs: Basil, oregano, thyme
- Meats: Beef jerky (ensure proper safety measures)
Tips for Successful Dehydration
- Cut Uniformly: Ensure all pieces are cut to similar sizes for even drying.
- Store Properly: Once dried, store your food in airtight containers in a cool, dark place.
- Experiment with Flavors: Consider marinating meats or sprinkling spices on vegetables before dehydrating for added flavor.
Understanding Food Dehydration
The process of dehydration works by removing moisture from food through heat and airflow. When moisture is removed, it inhibits microbial growth and enzymatic reactions that can lead to spoilage.
How Does a Food Dehydrator Work?
A typical food dehydrator operates using low heat combined with airflow to remove moisture from food items efficiently. The main components include:
- Drying Trays: These are where you place your food during dehydration. Multiple trays allow for batch processing.
- Heating Element: This generates hot air that mimics sun drying but does so much faster and more effectively.
- Fan: The fan circulates warm air throughout the dehydrator, ensuring even drying by preventing moisture buildup around the food items.
- Vents: These allow moisture-laden air to escape while drawing in fresh hot air[1][3].

Benefits of Homemade Dehydration
Homemade dehydrators offer several advantages:
- Customization: You can tailor your dehydrator's design based on what you intend to dry most often.
- Control Over Process: You have complete control over temperature settings and drying times, which can lead to better results depending on what you're dehydrating.
- Learning Experience: Building your own dehydrator provides valuable insights into food preservation techniques that can enhance your culinary skills.
Dehydration Methods Compared
While making a homemade dehydrator is an excellent choice for many, it's important to recognize other methods available:
| Method | Description | Pros | Cons |
| Sun Drying | Uses sunlight to dry foods | No energy cost; natural method | Weather-dependent; slow process |
| Air Drying | Relies on airflow at room temperature | Simple; no special equipment needed | Time-consuming; less effective |
| Oven Drying | Uses an oven set at low temperatures | More controlled environment | High energy consumption; uneven drying |
| Electric Dehydrators | Uses low heat and fans for efficient moisture removal | Fast; multiple trays available | Can be expensive |
Culinary Uses for Dehydrated Foods
Dehydrated foods are versatile ingredients that can enhance various dishes:
- Snacks: Enjoy dried fruits as healthy snacks or create your own jerky by marinating and dehydrating meats.
- Cooking Ingredients: Add dried vegetables or herbs directly into soups, stews, or sauces for enhanced flavor without needing fresh ingredients.
- Baking: Incorporate dried fruits into baked goods like muffins or bread for added texture and sweetness.
Conclusion
Building a homemade food dehydrator is a rewarding project that allows you to preserve seasonal produce and create healthy snacks at home. With just a few materials and some creativity, you can enjoy delicious dried fruits, vegetables, and meats all year round.
Not only does this method save money compared to purchasing commercial dehydrators, but it also provides control over the drying process—ensuring that you maintain flavor and nutritional quality in your preserved foods. As you experiment with different foods and recipes, you'll discover endless possibilities in culinary applications for dehydrated ingredients.

FAQ
1. What types of foods can I dehydrate?
You can dehydrate fruits like apples and bananas, vegetables such as tomatoes and peppers, herbs like basil and oregano, and even meats for jerky.
2. How long does it take to dehydrate food?
Dehydration times vary based on the type of food and thickness of slices but generally range from 6 to 24 hours.
3. Can I use my oven instead of a dehydrator?
Yes! You can use an oven set at low temperatures (around 140°F) as an alternative method for dehydrating foods.
4. How do I know when my food is fully dehydrated?
Dried foods should be leathery but not sticky; they should snap easily when bent but not crumble into powder.
5. Is it safe to dehydrate meat?
Yes! However, ensure proper safety measures are taken by marinating meat in acidic solutions before drying and storing it properly afterward.
Citations:
[1] https://cosori.com/blogs/blog/how-does-a-food-dehydrator-work
[2] https://www.newfoodmagazine.com/article/26433/texturisation-of-dehydrated-snacks/
[3] https://www.healthline.com/nutrition/dehydrated-food
[4] https://pmc.ncbi.nlm.nih.gov/articles/PMC7602416/
[5] https://www.researchgate.net/publication/362629760_Performance_of_Food_Dehydrator_Using_Different_Type_of_Distributor_Base_Plate
[6] https://www.allrecipes.com/article/how-to-use-a-food-dehydrator/


