Content Menu
● Understanding Solar Food Dehydration
● Benefits of Using a Solar Food Dehydrator
● Materials Needed
● Step-by-Step Guide to Building Your Solar Food Dehydrator
>> Step 1: Design Your Dehydrator
>> Step 2: Construct the Base
>> Step 3: Create the Drying Racks
>> Step 4: Add a Cover
>> Step 5: Create Ventilation
>> Step 6: Positioning Your Dehydrator
● Tips for Successful Dehydration
● Understanding How Solar Dryers Work
● Types of Solar Food Dehydrators
● Seasonal Considerations for Solar Drying
● Best Practices for Different Foods
● Common Mistakes When Using Solar Dehydrators
● Additional Tips for Maximizing Efficiency
>> 1. Track Sunlight Hours:
>> 2. Experiment with Different Designs:
>> 3. Utilize Local Resources:
>> 4. Maintain Your Dehydrator Regularly:
● Conclusion
● FAQ
>> 1. What types of foods can be dried using a solar dehydrator?
>> 2. How long does it take to dehydrate food using this method?
>> 3. Can I use my solar dehydrator in cloudy weather?
>> 4. How should I store dried foods?
>> 5. Is it safe to dry meat in a solar dehydrator?
● Citations:
Creating a solar food dehydrator is a sustainable and cost-effective way to preserve fruits, vegetables, and herbs. This guide will walk you through the steps to build your own solar dehydrator, utilizing natural sunlight to remove moisture from food, which helps in preserving its nutritional value and extending shelf life.
Understanding Solar Food Dehydration
Solar food dehydration works by harnessing the sun's energy to heat air, which then circulates through the drying chamber, removing moisture from the food. Unlike electric dehydrators, solar dehydrators are environmentally friendly and can be built with minimal materials.
Benefits of Using a Solar Food Dehydrator
- Energy Efficient: Utilizes renewable energy from the sun.
- Cost-Effective: Requires little to no operational costs after initial construction.
- Preserves Nutritional Value: Retains vitamins and minerals better than some other preservation methods.
- Simplicity: Easy to build with basic materials.
Materials Needed
To construct your solar food dehydrator, gather the following materials:
- Plywood or wood planks
- Clear plastic or glass for the cover
- Black paint (for heat absorption)
- Metal mesh or screen for drying racks
- Hinges for doors
- Screws and nails
- Thermometer (to monitor temperature)
- Optional: Wheels for mobility
Step-by-Step Guide to Building Your Solar Food Dehydrator
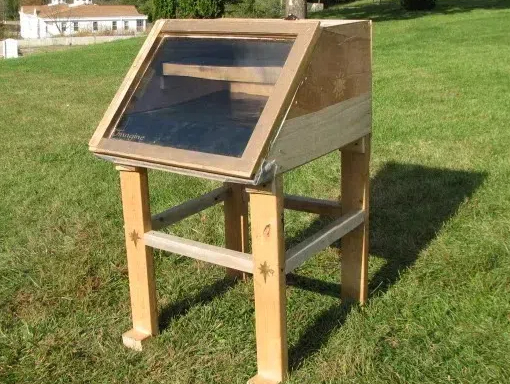
Step 1: Design Your Dehydrator
Choose a design that suits your needs. A simple box design is effective. The dimensions can vary; however, a common size is approximately 2 feet high, 3 feet wide, and 1 foot deep.
Step 2: Construct the Base
1. Cut the Wood: Cut your plywood into pieces for the base, sides, and top.
2. Assemble the Box: Use screws to assemble the sides and base into a rectangular box shape.
3. Paint Black: Paint the interior of the box black to enhance heat absorption.
Step 3: Create the Drying Racks
1. Cut Mesh or Screen: Measure and cut metal mesh or screen to fit inside your dehydrator.
2. Install Racks: Secure these racks inside the box at intervals to allow airflow.
Step 4: Add a Cover
1. Attach Clear Plastic or Glass: Use hinges to attach clear plastic or glass on top of the dehydrator. This allows sunlight to enter while keeping insects out.
2. Ensure Proper Sealing: Make sure there are no gaps where insects can enter.
Step 5: Create Ventilation
1. Drill Vents: Drill small holes at the bottom of the box for air intake and near the top for moisture escape.
2. Install Screens Over Vents: Cover these holes with mesh to prevent insects from entering.
Step 6: Positioning Your Dehydrator
1. Angle Your Dehydrator: Position your dehydrator so that it faces direct sunlight. An angle of about 45 degrees is ideal for maximizing sun exposure.
2. Monitor Temperature: Use a thermometer to ensure that internal temperatures reach between 120°F and 140°F (49°C - 60°C) for effective dehydration.

Tips for Successful Dehydration
- Prepping Food: Wash and cut fruits and vegetables into uniform sizes for even drying.
- Timing: The best time to use your solar dehydrator is on sunny days when temperatures are high.
- Storage: Once dried, store food in airtight containers in a cool, dark place.
Understanding How Solar Dryers Work
Solar food dryers operate based on basic principles of thermodynamics. The sun heats up the air within the dehydrator, creating a convection current that draws in fresh air while pushing out moist air. The efficiency of this process can be enhanced by:
- Using dark colors inside the dehydrator to absorb more heat.
- Designing vents that allow for optimal airflow without letting pests in.
- Ensuring that food is spread out evenly on drying racks to maximize exposure to warm air.
Types of Solar Food Dehydrators
There are various designs available for solar food dehydrators:
- Box Type: A simple design where food is placed inside a box with a clear lid, allowing sunlight to penetrate.
- Hot Box: A variation of the box type that uses an insulated body with an absorber plate inside.
- Tunnel Type: A more complex design that allows continuous airflow through a long chamber, ideal for larger quantities of food.
Each type has its advantages depending on your needs and available space.
Seasonal Considerations for Solar Drying
Solar drying is most effective during sunny months when days are longer and temperatures are higher. However, even in regions with less sun, you can still utilize solar drying effectively by:
- Choosing sunny days with minimal cloud cover.
- Utilizing backup heating sources like electric bulbs during cloudy spells.
This flexibility allows you to take advantage of seasonal produce throughout the year.
Best Practices for Different Foods
Different foods require specific preparation methods before dehydration:
- Fruits should be washed thoroughly and sliced into uniform pieces; some may benefit from pretreatment (like dipping in lemon juice) to prevent browning.
- Vegetables often require blanching before drying to preserve color and flavor; this involves briefly boiling them before cooling them rapidly in ice water.
- Herbs can be dried whole or chopped; ensure they are clean and free from moisture before placing them in the dehydrator.
Common Mistakes When Using Solar Dehydrators
Avoid these pitfalls when using your solar dehydrator:
- Overcrowding racks can lead to uneven drying; always leave space between pieces of food.
- Not monitoring temperature can result in insufficient dehydration or spoilage; check regularly using a thermometer.
- Failing to clean your dehydrator after use can lead to contamination during future drying sessions; always wash racks and surfaces thoroughly.
Additional Tips for Maximizing Efficiency
To truly optimize your solar food dehydrating experience:
1. Track Sunlight Hours:
- Invest in tools or apps that help track sunlight exposure throughout different seasons.
- Adjust your positioning based on seasonal changes in sun angle.
2. Experiment with Different Designs:
- Try building multiple designs if space allows; each design may yield different results depending on local climate conditions.
- Consider integrating thermal mass materials (like stones) inside your dehydrator that absorb heat during peak sun hours and release it slowly as temperatures drop later in the day.
3. Utilize Local Resources:
- Collaborate with local farmers or community gardens; pooling resources not only makes building larger community-oriented solar dryers feasible but also increases access to diverse produce throughout harvest seasons.
- Share knowledge about what works best locally—different regions may have unique best practices based on climate conditions.
4. Maintain Your Dehydrator Regularly:
- Inspect seals around glass/plastic covers periodically; ensuring they remain airtight helps maintain internal temperatures effectively.
- Clean screens regularly—this prevents buildup that could inhibit airflow or contaminate future batches with residual flavors from previous foods dried.
Conclusion
Building a solar food dehydrator is an excellent project that not only promotes sustainability but also provides a practical solution for preserving food at home. With minimal investment in materials and time, you can create an efficient tool that harnesses solar energy for healthy food preservation.
By utilizing this method, you can enjoy seasonal produce year-round while reducing waste and energy consumption associated with traditional preservation methods like freezing or canning.

FAQ
1. What types of foods can be dried using a solar dehydrator?
You can dry fruits, vegetables, herbs, nuts, and even meats using a solar dehydrator.
2. How long does it take to dehydrate food using this method?
The time varies based on the type of food and weather conditions but typically ranges from several hours to a full day.
3. Can I use my solar dehydrator in cloudy weather?
While it is less effective on cloudy days, you can still achieve some dehydration if there is enough ambient light.
4. How should I store dried foods?
Store dried foods in airtight containers in a cool, dark place to maintain freshness.
5. Is it safe to dry meat in a solar dehydrator?
Yes, but ensure that you follow proper safety guidelines regarding meat preparation and dehydration temperatures.
Citations:
[1] https://extension.usu.edu/sustainability/research/community-solar-dehydrator-plans
[2] https://www.motherearthnews.com/diy/solar-food-dehydrator-zmaz06aszraw/
[3] https://164454.fs1.hubspotusercontent-na1.net/hubfs/164454/Divisions/FSRD%20case%20studies%20-%20Dehytray.pdf
[4] https://www.nature.com/articles/s41598-024-78147-2
[5] https://www.instructables.com/Building-a-Solar-Food-Dehydrator/
[6] https://www.researchgate.net/publication/379938753_Construction_of_Solar_Food_Dehydrator_to_Minimize_the_Post-harvest_Losses
[7] https://www.researchgate.net/publication/369384756_Natural_energy_materials_and_storage_systems_for_solar_dryers_State_of_the_art


