Content Menu
● Understanding Solar Food Dehydrators
>> Benefits of Solar Food Dehydrators
● Materials Needed
● Step-by-Step Instructions
>> Step 1: Design Your Dehydrator
>> Step 2: Cut the Wood
>> Step 3: Assemble the Frame
>> Step 4: Install the Top Cover
>> Step 5: Paint and Prepare
>> Step 6: Add Glazing
>> Step 7: Position Your Dehydrator
● Operating Your Solar Dehydrator
● Tips for Successful Drying
● Creative Uses for Dried Foods
● Conclusion
● FAQ
>> 1. What types of foods can I dehydrate using a solar dehydrator?
>> 2. How long does it take to dehydrate food in a solar dehydrator?
>> 3. Can I use my solar dehydrator on cloudy days?
>> 4. How should I store dehydrated foods?
>> 5. Is it possible to build a solar dehydrator with recycled materials?
● Citations:
Creating a solar-powered food dehydrator is an excellent way to preserve fruits, vegetables, and herbs using renewable energy. This DIY project allows you to harness the sun's energy to dry food naturally, maintaining its flavor and nutrients without the need for electricity. In this article, we will guide you through the steps of building your own solar dehydrator, discuss its benefits, and address common questions related to the process.
Understanding Solar Food Dehydrators
Solar food dehydrators work by capturing sunlight and converting it into heat, which is then used to remove moisture from food items. Unlike electric dehydrators, solar models are eco-friendly and cost-effective. They are particularly useful for those who want to minimize their carbon footprint while enjoying home-dried foods.
Benefits of Solar Food Dehydrators
- Eco-Friendly: Utilizes renewable energy.
- Cost-Effective: Reduces electricity bills.
- Nutrient Preservation: Maintains the nutritional value of food.
- Versatile: Can dry a variety of foods including fruits, vegetables, and herbs.
- Simple Maintenance: Requires minimal upkeep compared to electric models.
Materials Needed
To build a solar food dehydrator, you will need the following materials:
- Plywood or wooden boards
- Clear plastic or glass for the top
- Black paint (non-toxic) or black metal for heat absorption
- Wire mesh or screen for airflow
- Hinges for access doors
- Screws and nails
- Optional: wheels for mobility
Step-by-Step Instructions
Step 1: Design Your Dehydrator
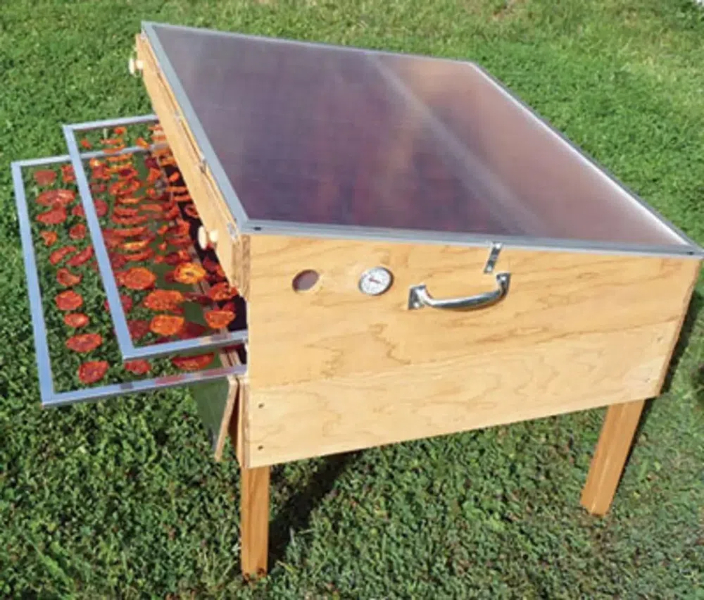
Before starting construction, sketch out your design. A simple box design with a slanted roof works well. The slant allows sunlight to hit the interior at an optimal angle.
Step 2: Cut the Wood
Using your design as a guide, cut the plywood into the necessary pieces:
- Two large pieces for the sides
- Two smaller pieces for the front and back
- A base piece
- A top piece (to be covered with clear plastic or glass)
Step 3: Assemble the Frame
1. Construct the Base: Attach the base piece to the bottom of two side pieces using screws.
2. Attach Front and Back: Securely fasten the front and back pieces to form a box.
3. Create Ventilation: Cut small holes at the bottom of the front panel for airflow. Proper ventilation is crucial as it allows moisture to escape during the drying process.
4. Add Shelves: Install wire mesh shelves inside where you will place food items. Ensure that these shelves are removable for easy cleaning.

Step 4: Install the Top Cover
Attach hinges to one side of the top panel so that it can open easily. This will allow you to load and unload food items conveniently. Ensure that it is securely fastened on the other side.
Step 5: Paint and Prepare
Paint the interior surfaces with black paint (if using wood) to enhance heat absorption. Allow it to dry completely before proceeding.
Step 6: Add Glazing
Cover the top with clear plastic or glass. This will trap heat inside while allowing sunlight to penetrate. Make sure that there are no gaps where heat could escape.
Step 7: Position Your Dehydrator
Place your dehydrator in a sunny location, ideally facing south (in the Northern Hemisphere) to maximize sunlight exposure. You may want to consider building a platform or stand that allows you to adjust its angle throughout the day as the sun moves.
Operating Your Solar Dehydrator
1. Prepare Your Food: Wash and slice fruits or vegetables into uniform pieces for even drying. Thinner slices will dry faster than thicker ones.
2. Load Food: Place your prepared food on the mesh shelves inside your dehydrator. Avoid overcrowding; ensure air can circulate freely around each piece of food.
3. Monitor Temperature: Use a thermometer to check internal temperatures; optimal drying occurs between 100°F (38°C) and 140°F (60°C). If temperatures are too low, drying times will increase significantly.
4. Check Regularly: Depending on sunlight intensity and humidity levels, drying times can vary from several hours to a full day. Rotate trays if necessary to ensure even drying.
5. Test for Doneness: Check your food periodically by tasting or feeling it; properly dried fruits should be leathery but not sticky, while vegetables should be brittle.
Tips for Successful Drying
- Choose High-Quality Ingredients: Use fresh produce that is free from blemishes or rot for best results.
- Pre-Treat if Necessary: Some fruits benefit from pre-treatment (e.g., soaking in lemon juice) to prevent browning and enhance flavor.
- Avoid High Humidity Days: For best results, choose sunny days with low humidity levels for drying.
- Store Dried Foods Properly: Once dried, store foods in airtight containers in a cool, dark place to prolong shelf life.
Creative Uses for Dried Foods
Dried foods can be used in various culinary applications:
- Snacks: Enjoy dried fruits as healthy snacks on their own or mixed with nuts.
- Cooking Ingredients: Rehydrate dried vegetables in soups or stews.
- Baking Additions: Incorporate dried fruits into muffins or bread recipes.
- Herbal Teas: Use dried herbs in homemade teas or infusions.
Conclusion
Building a solar-powered food dehydrator is not only a fun DIY project but also an environmentally friendly way to preserve your harvests. By following these steps, you can create an efficient dehydrator that allows you to enjoy dried fruits and vegetables year-round without relying on electricity. Embracing this sustainable method not only benefits your health by providing nutritious snacks but also contributes positively to our planet by reducing energy consumption.

FAQ
1. What types of foods can I dehydrate using a solar dehydrator?
You can dehydrate fruits (like apples, bananas, and berries), vegetables (such as tomatoes and peppers), herbs, and even meats if properly prepared.
2. How long does it take to dehydrate food in a solar dehydrator?
The time varies based on food type, thickness of slices, and sunlight intensity but typically ranges from 6 hours to over 12 hours.
3. Can I use my solar dehydrator on cloudy days?
Yes, while direct sunlight is ideal, solar dehydrators can still function on cloudy days; however, drying times may be longer.
4. How should I store dehydrated foods?
Store dried foods in airtight containers in a cool, dark place. Properly dried foods can last for months or even years if stored correctly.
5. Is it possible to build a solar dehydrator with recycled materials?
Absolutely! Many designs utilize recycled wood, old windows for glazing, and other found materials which can make this project both sustainable and cost-effective.
Citations:
[1] https://www.motherearthnews.com/diy/solar-food-dehydrator-plans-zm0z14jjzmar/
[2] https://ecofriend.com/building-solar-powered-food-dehydrator.html
[3] https://www.youtube.com/watch?v=nQqhUiJ5BZ0
[4] https://www.instructables.com/Solar-Food-Dehydrator-Dryer/
[5] https://www.youtube.com/watch?v=Z0f0jew8Whw
[6] https://offgridworld.com/how-to-make-a-solar-powered-food-dehydrator/
[7] https://www.istockphoto.com/de/bot-wall?returnUrl=%2Fde%2Fphotos%2Fsolar-dryer
[8] https://renew.org.au/renew-magazine/diy/diy-solar-dehydrator/


