Content Menu
● Introduction
>> Why Proper Storage Matters
● Understanding Cabinet Type Dehydrators
>> Key Features of Cabinet Type Dehydrators:
>> Preparing Food for Dehydration:
● Essential Steps Before Storing Dehydrated Foods
>> 1. Ensuring Complete Drying
>> 2. Cooling the Dehydrated Foods
>> 3. Choosing the Right Storage Containers
>>> Recommended Storage Options:
>> 4. Using Oxygen Absorbers and Desiccants
>> 5. Sealing and Labeling
● Optimal Storage Conditions
>> 1. Cool, Dark, and Dry Environment
>> 2. Avoiding Temperature Fluctuations
>> 3. Protecting Against Pests
● Best Practices for Specific Foods
>> Fruits
>> Vegetables
>> Meats
>> Herbs
● Advanced Storage Techniques
>> Nitrogen Flushing
>> Cold Storage
● Troubleshooting Common Storage Issues
>> 1. Mold Growth
>> 2. Loss of Flavor or Color
>> 3. Insect Infestation
>> 4. Rancidity
● Conclusion
● FAQ
>> 1. How long can I store dehydrated foods?
>> 2. Can I rehydrate dehydrated food that has been stored for a long time?
>> 3. Is it necessary to use oxygen absorbers?
>> 4. Can I store dehydrated food in the refrigerator?
>> 5. What are the best containers for long-term storage of dehydrated foods?
● Citations:
Introduction
Dehydrating food is an age-old preservation technique that has seen a resurgence in popularity, thanks to modern appliances like cabinet-type dehydrators. These dehydrators are particularly favored for their capacity, even drying, and ability to handle a wide variety of foods, from fruits and vegetables to meats and herbs. However, the effort put into dehydrating food is only worthwhile if the dried products are stored correctly to maintain their quality, flavor, and nutritional value.
This comprehensive guide is designed to provide you with all the information you need to properly store dried foods from your cabinet-type dehydrator. Whether you are a home enthusiast or a commercial producer, understanding the nuances of storage will ensure your dehydrated goods remain in optimal condition for extended periods.
Why Proper Storage Matters
Proper storage is crucial for several reasons:
- Preventing Moisture Absorption: Dried foods are susceptible to reabsorbing moisture from the environment, which can lead to spoilage and mold growth.
- Maintaining Nutritional Value: Exposure to light and air can degrade vitamins and other nutrients in dried foods.
- Preserving Flavor and Texture: Incorrect storage can result in loss of flavor and undesirable changes in texture.
- Extending Shelf Life: Proper storage significantly extends the shelf life of dehydrated foods, allowing you to enjoy them for months or even years.
- Preventing Rancidity: Especially for foods with high-fat content, like nuts, seeds, and some meats, proper storage prevents the fats from turning rancid.
- Inhibiting Enzymatic Activity: Although dehydration reduces enzymatic activity, it doesn't eliminate it entirely. Correct storage further slows down these processes, which can cause changes in color, flavor, and texture over time.
Understanding Cabinet Type Dehydrators
Cabinet-type dehydrators are designed to circulate warm air evenly around food items placed on multiple trays inside an enclosed cabinet. This design ensures consistent drying, making it ideal for large batches and a variety of food types. Knowing the capabilities of your dehydrator is the first step in ensuring your foods are adequately dried before storage.
Key Features of Cabinet Type Dehydrators:
- Capacity: Typically larger than other types of dehydrators, allowing for significant quantities of food to be dried simultaneously.
- Even Drying: Equipped with fans and heating elements that ensure uniform air circulation, resulting in consistent drying across all trays.
- Temperature Control: Precise temperature settings to suit different types of food, preventing overheating and preserving nutrients.
- Timer: Allows for accurate drying times, reducing the risk of under- or over-drying.
- Airflow Management: The ability to adjust airflow is crucial for dehydrating different types of food. Some models allow you to control the fan speed or vent openings to optimize drying.
- Material Quality: Look for dehydrators made from food-grade stainless steel or BPA-free plastics to ensure food safety.
Preparing Food for Dehydration:
- Selection: Choose fresh, high-quality produce or meats. Avoid using foods that are bruised, overripe, or showing signs of spoilage.
- Preparation: Wash, peel, and slice food items into uniform pieces to promote even drying. Thinner slices dry faster, but too thin and they may become brittle. Aim for consistent thickness throughout.
- Pre-treatment: Some fruits and vegetables may benefit from pre-treatment, such as blanching or acid dips, to prevent discoloration and improve shelf life.
- Blanching: Briefly submerge vegetables in boiling water followed by an ice bath to stop the cooking process. This helps to preserve color and nutrients.
- Acid Dips: Soak fruits like apples, peaches, and bananas in lemon juice or ascorbic acid solution to prevent browning.
- Loading: Arrange food items in a single layer on the dehydrator trays, ensuring adequate space for air circulation. Avoid overcrowding the trays, as this can impede airflow and result in uneven drying.

Essential Steps Before Storing Dehydrated Foods
Before you even think about storage, ensure your food is properly dehydrated. Inadequate drying is the most common reason for spoilage.
1. Ensuring Complete Drying
- Visual Inspection: Foods should be uniformly dry and slightly leathery in texture. There should be no visible signs of moisture. Check for any soft spots or areas that feel damp.
- The "Squeeze Test": For fruits, squeeze a few pieces. If any moisture is evident, they need further drying. This test is particularly important for fruits like apricots and plums, which can retain moisture in their centers.
- The "Snap Test": Vegetables should snap or break easily when bent. If they bend without snapping, they need more drying time.
- Meat: Jerky should bend without breaking and should not have any soft spots. It should have a slightly firm texture and not be sticky to the touch.
- The "Shake Test": For small items like herbs or berries, place them in a container and shake. If they stick together, they are not dry enough.
2. Cooling the Dehydrated Foods
Allow the dehydrated food to cool completely before packing it for storage. Warm food can create condensation inside the storage container, leading to moisture build-up and potential spoilage.
- Cooling Time: Let the food cool for at least 1 to 2 hours after dehydration. For larger batches or thicker items, you may need to allow for a longer cooling period.
- Cooling Location: Spread the food on a clean, dry surface in a well-ventilated area. Avoid placing the food in direct sunlight or near sources of heat during cooling.
- Humidity Considerations: If you live in a humid environment, cooling can take longer. Consider using a fan to circulate air and speed up the process.
3. Choosing the Right Storage Containers
Selecting the appropriate storage containers is vital for maintaining the quality of dehydrated foods. The ideal container should protect against moisture, air, light, and pests.
Recommended Storage Options:
Mylar Bags: These are excellent for long-term storage due to their low oxygen permeability and light-blocking properties. They are particularly effective when used with oxygen absorbers.
- Pros: Superior protection against moisture and oxygen, lightweight, and suitable for long-term storage.
- Cons: Single-use, require a heat sealer for proper closure.
- Sealing Tips: When sealing Mylar bags, make sure to remove as much air as possible before sealing. Use a high-quality heat sealer to ensure a strong, airtight seal.
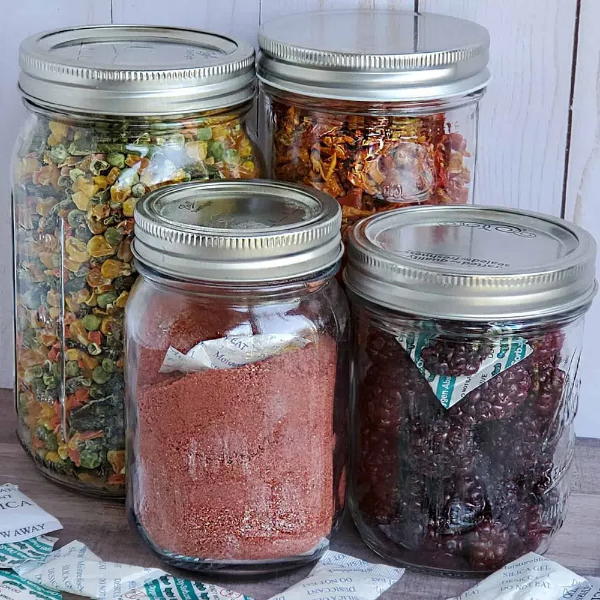
Glass Jars: Mason jars with airtight lids are a good option for storing dehydrated foods, especially if you plan to use them frequently. Clear jars allow you to monitor the food's condition, but they should be stored in a dark place.
- Pros: Reusable, airtight seal, easy to monitor food condition.
- Cons: Susceptible to light exposure, can be bulky.
- Jar Preparation: Ensure jars and lids are clean and dry before use. Sterilizing the jars can further reduce the risk of contamination.
Vacuum-Sealed Bags: Vacuum sealing removes air from the bag, preventing oxidation and moisture absorption.
- Pros: Excellent protection against oxygen and moisture, extends shelf life.
- Cons: Requires a vacuum sealer, bags can be expensive.
- Vacuum Sealing Tips: When vacuum sealing, leave some headspace in the bag to prevent the food from being crushed. Ensure the bag is free of wrinkles before sealing to create a strong seal.
Food-Grade Plastic Buckets: For large quantities, food-grade plastic buckets with airtight lids can be used, especially when combined with Mylar bags or vacuum-sealed bags inside.
- Pros: Ideal for bulk storage, durable, and stackable.
- Cons: Can be bulky, requires additional inner packaging.
- Bucket Liners: Use food-grade liners inside the buckets to provide an extra layer of protection against moisture and pests.
| Container Type | Pros | Cons |
| Mylar Bags | Superior protection against moisture and oxygen, lightweight, long-term | Single-use, requires heat sealer |
| Glass Jars | Reusable, airtight seal, easy to monitor food condition | Susceptible to light exposure, can be bulky |
| Vacuum-Sealed Bags | Excellent protection against oxygen and moisture, extends shelf life | Requires vacuum sealer, bags can be expensive |
| Food-Grade Buckets | Ideal for bulk storage, durable, stackable | Can be bulky, requires additional inner packaging |
4. Using Oxygen Absorbers and Desiccants
Oxygen Absorbers: These small packets contain iron powder that absorbs oxygen, reducing the oxygen level inside the container and preventing oxidation and the growth of aerobic bacteria and mold.
- How to Use: Place one or more oxygen absorbers in the container before sealing. The number of absorbers depends on the size of the container. Follow the manufacturer's instructions for proper usage.
- Determining the Right Size: Use the correct size of oxygen absorber for the volume of the container. Too small, and it won't absorb enough oxygen. Too large, and it may be wasteful.
Desiccants: These are drying agents that absorb moisture. While less common for dehydrated foods, they can be useful in particularly humid environments.
- How to Use: Similar to oxygen absorbers, place the desiccant packet inside the container before sealing.
- Types of Desiccants: Silica gel and calcium sulfate are common types of desiccants. Choose a food-grade desiccant for safety.
Recharging Desiccants: Some desiccants can be recharged by heating them in the oven. Follow the manufacturer's instructions for recharging.
5. Sealing and Labeling
- Sealing: Ensure the container is properly sealed to prevent air and moisture from entering. For Mylar bags, use a heat sealer. For jars, ensure the lid is tightly closed. For vacuum-sealed bags, follow the manufacturer's instructions.
- Labeling: Label each container with the date of dehydration and the contents. This helps you keep track of how long the food has been stored and ensures you use older items first.
- Label Information: Include the type of food, the date of dehydration, and any other relevant information, such as the batch number or special notes about the preparation.
- Label Placement: Place the label in a prominent location on the container so that it is easily visible.
Optimal Storage Conditions
Where you store your dehydrated foods is as important as how you store them.
1. Cool, Dark, and Dry Environment
- Temperature: Store dehydrated foods in a cool place, ideally between 50°F and 70°F (10°C and 21°C). Higher temperatures can accelerate the degradation of food.
- Temperature Monitoring: Use a thermometer to monitor the temperature in your storage area and ensure it remains within the optimal range.
- Darkness: Exposure to light can degrade the quality of dehydrated foods. Store containers in a dark pantry, cabinet, or basement.
- Light Protection: If storing in glass jars, consider wrapping the jars in dark cloth or paper to protect them from light.
- Dryness: A low-humidity environment is essential to prevent moisture absorption. Avoid storing dehydrated foods in damp areas.
- Humidity Control: Use a dehumidifier to control humidity in your storage area, especially if you live in a humid climate.
2. Avoiding Temperature Fluctuations
Consistent temperatures are crucial. Avoid storing dehydrated foods in areas where temperatures fluctuate, such as near ovens or in direct sunlight.
- Insulation: Insulate your storage area to minimize temperature fluctuations.
- Location: Choose a storage location that is away from sources of heat and cold.
3. Protecting Against Pests
Store containers in a location that is protected from pests such as rodents and insects. Food-grade buckets with tight-fitting lids can provide an additional layer of protection.
- Pest Control: Implement a pest control plan to prevent infestations in your storage area.
- Container Inspection: Regularly inspect your storage containers for any signs of pest damage.
Best Practices for Specific Foods
Different foods have different storage requirements. Here are some specific tips for common dehydrated items:
Fruits
- Apples, Bananas, and Berries: These should be thoroughly dried to prevent mold growth. Consider using oxygen absorbers in Mylar bags for long-term storage.
- Apple Slices: Store apple slices in airtight containers with a desiccant to prevent them from becoming sticky.
- Banana Chips: Store banana chips in airtight containers to prevent them from becoming soft.
- Stone Fruits (Peaches, Plums): These fruits are high in sugar, making them prone to stickiness. Ensure they are completely dry and consider storing them in smaller portions to prevent sticking together.
- Peach Slices: Consider dusting peach slices with cornstarch before drying to reduce stickiness.
- Plums (Prunes): Store prunes in airtight containers and check them regularly for signs of moisture.
Vegetables
- Leafy Greens (Spinach, Kale): These should be dried until crisp. Store in airtight containers with oxygen absorbers to prevent them from becoming papery.
- Kale Chips: Store kale chips in airtight containers immediately after cooling to prevent them from absorbing moisture.
- Spinach Flakes: Store spinach flakes in airtight containers away from light to preserve their color and nutrients.
- Root Vegetables (Carrots, Potatoes): Ensure these are fully dried to prevent mold. Blanching before dehydration can improve their shelf life.
- Carrot Chips: Store carrot chips in airtight containers with a desiccant to prevent them from becoming soft.
- Potato Slices: Blanch potato slices before dehydrating to prevent discoloration and improve their texture.
Meats
- Jerky: Store in vacuum-sealed bags or Mylar bags with oxygen absorbers. Jerky should be stored in the freezer for optimal storage.
- Beef Jerky: Store beef jerky in the freezer to prevent the fat from going rancid.
- Turkey Jerky: Store turkey jerky in vacuum-sealed bags with oxygen absorbers to prevent it from becoming dry and brittle.
- Ground Meat: Dehydrated ground meat should be stored in the freezer to prevent fat from going rancid.
- Rehydrating Ground Meat: When rehydrating ground meat, use hot water or broth to ensure it is fully cooked before consumption.
Herbs
- Leafy Herbs (Basil, Mint): Dry these until they are brittle. Store in airtight containers away from light to preserve their color and flavor.
- Basil Leaves: Store basil leaves in airtight containers in a dark, cool place to preserve their flavor and aroma.
- Mint Leaves: Store mint leaves in airtight containers to prevent them from becoming musty.
- Ground Herbs: Store in airtight containers in a cool, dark place. Ground herbs have a shorter shelf life than whole herbs.
- Herb Blends: Store herb blends in airtight containers and use them within 6-12 months for optimal flavor.
Advanced Storage Techniques
Nitrogen Flushing
For commercial applications or extremely long-term storage, nitrogen flushing can be used. This involves replacing the air inside the container with nitrogen gas, which is inert and prevents oxidation.
Cold Storage
Storing dehydrated foods in the refrigerator or freezer can significantly extend their shelf life. However, it's important to ensure that the containers are airtight to prevent moisture absorption.
Troubleshooting Common Storage Issues
1. Mold Growth
- Cause: Insufficient drying or moisture absorption.
- Solution: Discard the affected food. Ensure future batches are thoroughly dried and stored in airtight containers with oxygen absorbers in a cool, dry place.
- Prevention: Use a food thermometer to check the internal temperature of thicker foods during dehydration to ensure they are fully dried.
2. Loss of Flavor or Color
- Cause: Exposure to light, air, or high temperatures.
- Solution: Store dehydrated foods in dark, cool places in airtight containers. Use Mylar bags for optimal protection.
- Reviving Flavor: If dehydrated herbs have lost some of their flavor, you can revive them by gently crushing them before use.
3. Insect Infestation
- Cause: Improperly sealed containers or pre-existing infestation.
- Solution: Discard the affected food. Inspect other stored foods and ensure all containers are properly sealed. Consider storing foods in food-grade buckets for added protection.
- Inspection Practices: Regularly inspect your pantry or storage area for signs of pests.
4. Rancidity
- Cause: High-fat content foods not stored properly, leading to oxidation of fats.
- Solution: Discard the affected food. Ensure future batches are stored in airtight containers in the freezer.
Conclusion
Properly storing dehydrated foods from your cabinet-type dehydrator is essential for preserving their quality, flavor, and nutritional value. By following the guidelines outlined in this article, including ensuring complete drying, using appropriate storage containers, maintaining optimal storage conditions, and troubleshooting common issues, you can enjoy your dehydrated goods for months or even years. Whether you're preserving a bountiful harvest or creating lightweight backpacking meals, mastering the art of food storage is a rewarding endeavor.

FAQ
1. How long can I store dehydrated foods?
Properly stored dehydrated foods can last anywhere from several months to several years. Fruits and vegetables typically last 1-2 years, while meats can last even longer if stored in the freezer.
2. Can I rehydrate dehydrated food that has been stored for a long time?
Yes, you can rehydrate dehydrated food that has been stored for a long time, but be sure to inspect it for any signs of spoilage before consumption. If the food smells off or has mold, discard it.
3. Is it necessary to use oxygen absorbers?
While not always necessary, oxygen absorbers significantly extend the shelf life of dehydrated foods by reducing oxygen levels in the storage container. They are particularly useful for foods that are sensitive to oxidation, such as fruits and meats.
4. Can I store dehydrated food in the refrigerator?
Generally, dehydrated food does not need to be refrigerated. However, if you live in a particularly humid climate, refrigerating dehydrated foods can help prevent moisture absorption.
5. What are the best containers for long-term storage of dehydrated foods?
Mylar bags with oxygen absorbers are generally considered the best option for long-term storage of dehydrated foods due to their superior protection against moisture, oxygen, and light. Vacuum-sealed bags and glass jars are also good options.
Citations:
[1] https://blog.rootsandharvest.com/how-to-store-dehydrated-food-for-long-term-storage/
[2] https://www.fsdalle.com/news/how-to-store-dehydrated-food/
[3] https://patents.google.com/patent/CN110207480A/zh
[4] https://www.thepurposefulpantry.com/how-to-store-dehydrated-foods/
[5] https://www.masterclass.com/articles/how-long-does-dehydrated-food-last
[6] https://patents.google.com/patent/CN201919616U/zh
[7] https://explorenborgen.com/dehydrating-meat/
[8] https://www.freshoffthegrid.com/dehydrating-food/
[9] https://www.healthline.com/nutrition/dehydrated-food


