Content Menu
● Understanding Cabinet Type Dehydrators
>> Key Features of a Cabinet Dehydrator:
● Ensuring Food Safety: The Most Important Consideration
>> Key Food Safety Principles:
● Step-by-Step Guide to Drying Meat in a Cabinet Dehydrator
● Tips for Successful Meat Drying
● Troubleshooting Common Issues
● Additional Considerations
● Conclusion
● FAQ
>> 1. What temperature should I use to dehydrate meat?
>> 2. How long does it take to dehydrate meat?
>> 3. How do I know when the meat is done?
>> 4. Can I dehydrate raw meat in a cabinet dehydrator?
>> 5. How should I store dehydrated meat?
● Citations:
Meat dehydration, a method of food preservation practiced for centuries, has seen a resurgence in popularity thanks to modern technology, particularly the cabinet-type dehydrator. This appliance provides a controlled environment to remove moisture from meat, inhibiting bacterial growth and extending its shelf life. Safe meat drying requires careful attention to preparation, temperature, hygiene, and storage. This comprehensive guide will provide detailed instructions on how to use a cabinet-type dehydrator for meat drying safely and effectively.
Understanding Cabinet Type Dehydrators
A cabinet type dehydrator is an enclosed appliance featuring multiple trays or racks within a cabinet, coupled with a heating element and a fan to circulate air. Unlike open-air drying methods, these dehydrators offer consistent temperature and airflow, crucial for uniform drying and food safety.
Key Features of a Cabinet Dehydrator:
- Precise Temperature Control: The ability to set and maintain a specific temperature is vital for meat drying. Different meats may require slightly different temperatures, and precise control ensures pathogens are destroyed without excessively hardening the meat.
- Even Air Circulation: Forced air circulation ensures that moisture is removed uniformly from all surfaces of the meat. This reduces the risk of uneven drying, which can lead to spoilage.
- Multiple Trays: The capacity to dry large batches of meat at once makes cabinet dehydrators ideal for home and commercial use.
- Digital Timers: Timers allow users to set the dehydrator for a specific period, preventing over-drying and automating the process.
- Insulated Cabinets: Some models include insulation, improving energy efficiency and maintaining consistent temperatures within the dehydrator.
Ensuring Food Safety: The Most Important Consideration
Food safety is paramount when drying meat. Improperly dried meat can harbor harmful bacteria, leading to foodborne illnesses.
Key Food Safety Principles:
- Hygiene: The dehydrator and all utensils must be thoroughly cleaned and sanitized before use. This includes trays, knives, cutting boards, and any other surfaces that come into contact with the meat.
- Cooking Before Dehydration: Cooking meat to a safe internal temperature before dehydrating is crucial to eliminate pathogens like Salmonella and E. coli. The U.S. Department of Agriculture (USDA) recommends cooking beef to an internal temperature of 160°F (72°C) and poultry to 165°F (74°C) before drying.
- Temperature Control: Maintaining a consistent temperature throughout the drying process is essential. Too low a temperature can allow bacteria to grow, while too high a temperature can cook the meat rather than dry it.
- Moisture Content: The final moisture content of the dried meat must be low enough to inhibit bacterial growth. The USDA recommends that jerky should have a water activity level of 0.85 or less.
- Proper Storage: Dried meat must be stored in airtight containers to prevent reabsorption of moisture and contamination.
Step-by-Step Guide to Drying Meat in a Cabinet Dehydrator
Follow these steps to safely and effectively dry meat using a cabinet-type dehydrator:
1. Choose Your Meat: Select lean cuts of meat for drying. Excess fat can become rancid during the drying process. Beef, venison, turkey, and chicken are common choices.
2. Prepare the Meat: Trim any visible fat from the meat. Partially freeze the meat to make slicing easier. Use a sharp knife or meat slicer to cut the meat into thin, uniform slices, about 1/8 to 1/4 inch thick. Thicker slices will take longer to dry and may not dry evenly.
3. Marinating (Optional): Marinating the meat can add flavor and tenderize it. Use a marinade that is low in oil, as oil can impede the drying process. Marinate the meat in the refrigerator for at least 4 hours, or overnight.
4. Pre-Cooking the Meat: Cook the meat to a safe internal temperature before dehydrating. This can be done by baking, boiling, or steaming the meat.
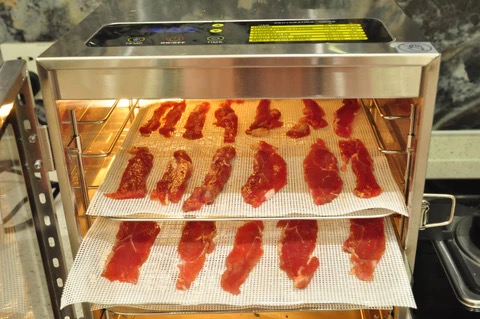
5. Arrange on Trays: Place the meat slices on the dehydrator trays, ensuring they do not overlap. Overlapping can prevent even drying and increase the risk of spoilage.
6. Set Temperature and Time: Set the dehydrator to the appropriate temperature, typically around 160°F (71°C) for beef and 165°F (74°C) for poultry. Set the timer for 4 to 24 hours, depending on the thickness of the meat and the moisture content.
7. Monitor the Drying Process: Check the meat periodically to ensure it is drying evenly. Rotate the trays if necessary. The meat should be dry but not brittle. It should have a jerky-like consistency and no visible moisture.
8. Test for Doneness: To test for doneness, remove a few slices of meat from the dehydrator and let them cool to room temperature. Bend the slices. They should crack but not break. If the meat is still pliable, it needs to be dried longer.
9. Pasteurize After Drying (Optional but Recommended): To further ensure food safety, pasteurize the dried meat after drying. This can be done by heating the dried meat in a preheated oven at 275°F (135°C) for 10 minutes.
10. Cool and Store: Let the meat cool completely before storing it in an airtight container. Consider vacuum sealing the meat for long-term storage. Store in a cool, dry place.

Tips for Successful Meat Drying
- Choose Lean Meats: Avoid fatty cuts of meat, as fat can spoil during drying.
- Slice Evenly: Uniform slices dry more evenly, reducing the risk of some pieces being under-dried while others are over-dried.
- Use a Marinade: Marinades can add flavor and help tenderize the meat. Choose marinades with low oil content.
- Rotate Trays: Rotating the trays periodically ensures even drying.
- Monitor Temperature: Use a thermometer to ensure the dehydrator maintains a consistent temperature.
- Test for Doneness: Check the meat regularly to ensure it is drying properly.
- Pasteurize After Drying: Pasteurizing the dried meat helps to kill any remaining bacteria.
- Store Properly: Store dried meat in an airtight container in a cool, dry place.
Troubleshooting Common Issues
- Meat is not drying evenly: Ensure the meat slices are uniformly thick and that the trays are not overcrowded. Rotate the trays periodically.
- Meat is drying too slowly: Increase the temperature slightly, but be careful not to exceed recommended temperatures.
- Meat is too hard and brittle: Reduce the drying time or lower the temperature.
- Meat is spoiling: Ensure the meat is cooked to a safe internal temperature before drying and that the dehydrator is clean and sanitized.
Additional Considerations
- Altitude: At higher altitudes, the boiling point of water is lower, which can affect drying times. You may need to increase the drying time or adjust the temperature.
- Humidity: High humidity can also affect drying times. It may take longer to dry meat in humid environments.
- Equipment Quality: Invest in a high-quality cabinet dehydrator with precise temperature control and even air circulation.
Conclusion
Mastering the art of using a cabinet-type dehydrator for meat drying safely is a rewarding skill, allowing you to create delicious and nutritious snacks and meals. By adhering to the principles of food safety, proper preparation, and vigilant monitoring, you can confidently produce high-quality dried meat that is both flavorful and safe to consume. Remember, safety is always the top priority when drying meat, and following these guidelines will help ensure a successful and enjoyable meat-drying experience.

FAQ
1. What temperature should I use to dehydrate meat?
The ideal temperature for dehydrating meat is around 160°F (71°C) for beef and 165°F (74°C) for poultry. This temperature helps to remove moisture effectively while minimizing the risk of bacterial growth. Always use a reliable thermometer to monitor the dehydrator's temperature.
2. How long does it take to dehydrate meat?
Drying times can vary from 4 to 24 hours, depending on the thickness of the meat slices, their moisture content, and the efficiency of your dehydrator. Thicker slices will require longer drying times. Monitor the meat regularly to ensure it is drying properly.
3. How do I know when the meat is done?
The meat should be dry but not brittle. It should have a jerky-like consistency and no visible moisture. To test for doneness, remove a few slices of meat from the dehydrator and let them cool to room temperature. Bend the slices. They should crack but not break. If the meat is still pliable, it needs to be dried longer.
4. Can I dehydrate raw meat in a cabinet dehydrator?
No, it is not safe to dehydrate raw meat. Always cook the meat to a safe internal temperature before dehydrating to kill harmful pathogens. Cooking the meat before drying is a critical step in ensuring food safety.
5. How should I store dehydrated meat?
Store dehydrated meat in an airtight container in a cool, dry place. For extended storage, vacuum sealing is recommended. Properly stored dehydrated meat can last for several months. Be sure to label the container with the date of drying and the type of meat.
Citations:
[1] https://www.dryeratech.com/cabinet-type-dehydrator-vs-traditional-drying-methods-which-is-better.html
[2] https://www.aussiestormshop.com.au/assets/files/AU%2058R-CUD.pdf
[3] https://patents.google.com/patent/CN110207480A/zh
[4] https://www.ike.cn/precious-cabinet-dryer-for-food-middle-pump-ike.html
[5] https://www.backpackingchef.com/dehydrating-meat.html
[6] http://download.beko.com/Download.UsageManualsBeko/CN/25219_1_2960310325_KM.pdf
[7] https://drybox.in/cabinet-type-dehydrator/
[8] https://ucanr.edu/sites/camasterfoodpreservers/files/341222.pdf


