Content Menu
● What is a Cabinet Type Dehydrator?
● Unboxing and Initial Setup
● Component Installation
● Preparing Food for Dehydration
● Operating the Dehydrator
● Advanced Dehydration Techniques
● Tips for Optimal Dehydration
● Safety Precautions
● Cleaning and Maintenance
● Troubleshooting
● Conclusion
● FAQ
>> 1. What temperature should I use to dehydrate fruits?
>> 2. How do I ensure even drying?
>> 3. How often should I clean my dehydrator?
>> 4. What do I do if my food is not drying properly?
>> 5. Can I purchase additional trays for my dehydrator?
● Citations:
As a Chinese food dehydrator manufacturing factory, providing OEM services to international food dehydrator brands, wholesalers, and manufacturers, understanding the intricacies of cabinet type dehydrators is crucial. This guide, excluding laundry-related content, offers a detailed walkthrough on setting up and using these machines effectively. Cabinet dehydrators are favored for their superior control, consistency, and efficiency in drying a wide range of foods.

What is a Cabinet Type Dehydrator?
A cabinet type dehydrator is a self-contained unit specifically engineered to eliminate moisture from food products. This process extends the shelf life of the food while preserving its natural qualities. Unlike simpler dehydrators, cabinet models offer a controlled environment that ensures uniform drying, leading to high-quality products and reduced waste. These machines usually integrate a heat pump dryer with a precisely managed chamber to maximize performance and energy efficiency.
Key Features of Cabinet Type Dehydrators:
- High Efficiency: Ensures consistent dehydration while minimizing energy waste.
- Capacity: Suitable for small-to-medium-scale operations, handling batches from 100kg to 1000kg.
- Integrated Design: Optimizes performance and energy utilization.
- Versatility: Can dry a wide range of foods, including fruits, vegetables, meats, herbs, and spices.
Unboxing and Initial Setup
1. Unboxing:
- Carefully unpack the dehydrator and check for any visible damage.
- Ensure all components are included (trays, power cord, control panel, etc.).
- Retain the original packaging for potential returns or warranty claims.
2. Placement:
- Place the dehydrator on a flat, dry, and stable surface.
- Ensure there is at least six inches of space away from walls and other electronic devices. This allows for proper ventilation and prevents overheating.
- Avoid placing the dehydrator in direct sunlight or near sources of heat, as this can affect its performance.
3. Cleaning:
- Clean the trays and interior with a damp cloth to remove any manufacturing residue. Use mild soap if necessary.
- Ensure all parts are completely dry before use to prevent the growth of mold or bacteria.
- Some dehydrators may have removable parts that are dishwasher-safe; refer to your manual for specific instructions.
Component Installation
1. Tray Installation:
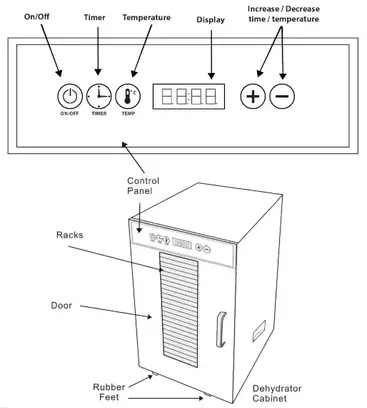
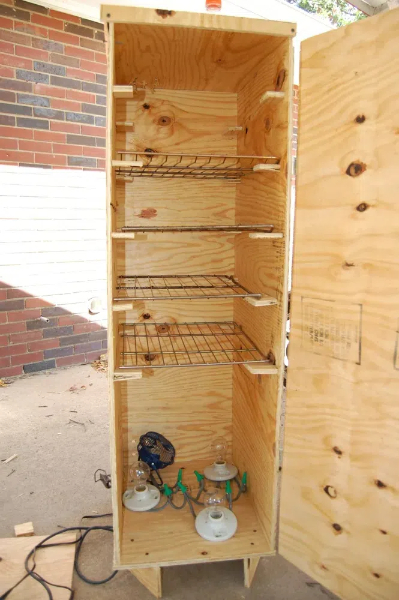
- Fit the drying rack supports inside the cabinet, locating the tabs in the slots in the sides of the cabinet. Each drying rack support accommodates two drying racks when in use, so there are supports for each side of the dehydrator cabinet.
- When fitting the drying rack supports, note that each support has two projecting lugs on one end. These are the stops for the drying racks and they should be fitted towards the rear of the cabinet.
- The wire mesh of each drying rack is fixed to one side of the drying rack frame. This side faces upwards when inserting the racks in the cabinet, so that the smooth edges of the drying rack face downwards and slide easily along the drying rack supports.
2. Door Installation:
- The door of the dehydrator has two locating indents towards the bottom of its vertical edges. When fitting the door to the dehydrator these indents correspond to two locating notches on the edges of the cabinet near the bottom.
- Present the door to the front of the dehydrator with its locating indents aligned with the locating notches in the cabinet and press the door flat against the cabinet frame.

3. Power Connection:
- Connect the power cord to the dehydrator.
- Plug the other end into a grounded electrical outlet.
- Ensure the voltage matches the dehydrator's specifications.
Preparing Food for Dehydration
1. Selection:
- Choose fresh, ripe foods for the best results. Overripe or bruised foods may not dehydrate properly and can affect the taste and texture of the final product.
- Consider the moisture content of the food; items with high moisture content may take longer to dehydrate.
2. Cleaning:
- Thoroughly wash all food items to remove dirt and impurities. Use a vegetable brush for items with thick skins.
- Rinse the food thoroughly after washing to remove any soap residue.
3. Preparation:
- Cut food into uniform slices or pieces to ensure even drying. Uneven slices can lead to some pieces drying faster than others, resulting in inconsistent results.
- Consider pre-treating certain fruits (like apples or bananas) with lemon juice to prevent browning. This helps to maintain their color and prevent oxidation.
- Blanching vegetables before dehydrating can help to preserve their color and nutrients. This involves briefly boiling or steaming the vegetables before placing them in the dehydrator.
4. Arrangement:
- Arrange the foods inside the tiered trays, making sure that you place the foods in such a way that they do not overlap, and the air is able to circulate freely.
- Always start by placing the food in the lower sections of the dehydrator. Leave the central hole uncovered.
- Avoid overcrowding the trays, as this can restrict airflow and lead to uneven drying.
Operating the Dehydrator
1. Loading Trays:
- Load prepared food onto the trays, ensuring not to overcrowd them.
- Maintain space between items for optimal air circulation.
- Consider using parchment paper or silicone mats on the trays to prevent food from sticking.
2. Stacking Trays:
- Place the trays into the base unit and put the ventilated lid on the top. The ventilated lid should always be in place during operation.
- Improperly stacked trays will negatively affect the drying process. It is recommended that you put all sections into the appliance regardless of how many are empty.
* Check the tray configuration in the manual.
3. Setting Temperature:
- Turn the temperature control dial clockwise from the ‘OFF' position to turn on the Dehydrator.
- Use the temperature control dial to set the desired temperature of the Food Dehydrator (ranging from LOW 35°C to a max of 70°C).
- Consult the dehydrator's manual or a reliable dehydration guide for recommended temperatures for different types of food.
4. Drying Time:
- Drying times vary depending on the type of food and desired dryness. Factors such as humidity and the thickness of the food slices can also affect drying time.
- Refer to your dehydrator's manual or specific recipes for recommended times.
- Monitor the food closely and adjust the drying time as needed.
5. Monitoring and Rotation:
- It is important to rotate the trays during dehydration. Trays nearest to the bottom are exposed to the hottest, driest air, meaning food.
- Check the food periodically and remove items as they become fully dried.
- Consider using a moisture meter to accurately measure the moisture content of the food.
Advanced Dehydration Techniques
- Blanching: For certain vegetables, blanching before dehydration is recommended. This involves briefly boiling or steaming the vegetables to stop enzyme activity, preserving color and nutrients.
- Pre-treatment: Soaking fruits in lemon juice or ascorbic acid solutions prevents browning and oxidation.
- Conditioning: After dehydration, allow the food to cool completely and then store it in an airtight container. This helps to equalize the moisture content and prevent spoilage.
- Pasteurization: For meat products, ensure that the internal temperature reaches a safe level to kill any harmful bacteria.
Tips for Optimal Dehydration
- Consistent Temperatures: Ensure your dehydrator maintains a consistent temperature throughout the drying process. Fluctuations in temperature can affect the quality and safety of the dried food.
- Airflow: Proper airflow is crucial for even drying. Do not block vents or overcrowd trays.
- Food Placement: Place thicker items closer to the heat source and ensure even spacing between pieces.
- Moisture Check: The objective in dehydrating is getting almost all the water out of the food. The goal is 90 – 95% dehydrated. If your dehydrated food feels soft, spongy, or sticky it's probably not dehydrated enough.
- Batch Size: For smaller loads, leave the vent closed if you are only using one tray to dehydrate. If using more than one tray, be sure to leave the vent open during the dehydrating process.
- Storage: Store dehydrated food in airtight containers in a cool, dark, and dry place. Proper storage is essential for maintaining the quality and extending the shelf life of the food.
Safety Precautions
- Always unplug the dehydrator before cleaning or performing maintenance.
- Do not immerse the dehydrator in water or other liquids.
- Do not use abrasive cleaners or scouring pads on the dehydrator.
- Keep the dehydrator away from flammable materials.
- Do not operate the dehydrator if it is damaged.
Cleaning and Maintenance
1. Unplug: Always unplug before performing user maintenance, connecting or disconnecting attachments, or changing accessories. Ensure the cable is stored safely to prevent.
2. Cool Down: Let the dehydrator cool completely before cleaning.
3. Tray Cleaning: Wash trays with warm, soapy water. Use a soft brush to remove any stuck-on food particles.
4. Interior Cleaning: Wipe the interior of the dehydrator with a damp cloth. Avoid using abrasive cleaners.
5. Storage: Store the dehydrator in a cool, dry place when not in use.
6. Regular Inspection: Periodically inspect the dehydrator for any signs of wear or damage. Check the power cord, trays, and heating element.
Troubleshooting
- Uneven Drying: Ensure trays are not overcrowded and rotate them periodically. Check if the dehydrator is placed on a level surface.
- Food Not Drying: Check the temperature setting and ensure the dehydrator is heating properly. Verify that the power cord is properly connected.
- Unpleasant Odors: Clean the dehydrator thoroughly after each use to prevent odor buildup. Consider using a mild disinfectant.
- Dehydrator Overheating: Check the vents to ensure they are not blocked. Reduce the temperature setting if necessary.
Conclusion
Cabinet type dehydrators are an excellent choice for efficiently drying a variety of foods while preserving their nutritional value and flavor. As an OEM provider, mastering these techniques will enable you to deliver superior products to your clients.

FAQ
1. What temperature should I use to dehydrate fruits?
Fruits, fruit rolls and vegetables should be dried at 130°F to 140°F (55°C to 60°C). By drying foods in this temperature range you will minimize the loss of.
2. How do I ensure even drying?
Ensure trays are not overcrowded and rotate them periodically.
3. How often should I clean my dehydrator?
Clean the dehydrator thoroughly after each use to prevent odor buildup.
4. What do I do if my food is not drying properly?
Check the temperature setting and ensure the dehydrator is heating properly. The objective in dehydrating is getting almost all the water out of the food. The goal is 90 – 95% dehydrated. If your dehydrated food feels soft, spongy, or sticky it's probably not dehydrated enough.
5. Can I purchase additional trays for my dehydrator?
Yes. Additional replacement trays are available for purchase online on our Replacement Parts page or by contacting our customer support team.
Citations:
[1] https://www.ukjuicers.com/Lib/Doc/Nutridry_ST-10_online_instruction_manual.pdf
[2] https://www.vonhaus.com/media/manuals/2013381__5_TRAY_STAINLESS_STEEL_DEHYDRATOR_WM.pdf
[3] https://www.aromaco.com/faq/food-dehydrators/
[4] https://www.electrolux-ui.com/DocumentDownLoad.aspx?DocURL=2011%5C136%5C918250umEN.pdf
[5] https://www.lakeland.co.uk/content/documents/FoodDehydrator_Instructions_14210.pdf
[6] https://media.tractorsupply.com/is/content/TractorSupplyCompany/tsc/product/2/09/91/40/2099140_Man1.pdf
[7] https://www.ivins.com/wp-content/uploads/2021/04/RCP-Dehydrating-101.pdf
[8] http://download.beko.com/Download.UsageManualsBeko/CN/25219_1_2960310325_KM.pdf
[9] https://www.dryeratech.com/how-to-dehydrate-fruits-and-vegetables-with-a-cabinet-type-dehydrator.html
[10] https://www.nesco.com/wp-content/uploads/2024/07/Dehydrator-Instructions-and-Recipes-Booklet-300-02750.pdf
[11] https://www.linkedin.com/pulse/common-questions-food-dehydrators-aradmachinery
[12] https://www.pressurecooker-outlet.com/Manuals/Weston-Steel-Dehydrator.pdf
[13] https://www.everythingkitchens.com/media/manual/7100.pdf
[14] https://images.thdstatic.com/catalog/pdfImages/1e/1e6fc46e-78ce-434a-b5be-4990ea1746f7.pdf


